When you showcase your event(s) on Sticky Tickets, each event is granted its dedicated web page. This page serves as the central hub where you can input event details, incorporate logos/images, and most importantly, provide a seamless avenue for patrons to acquire tickets or register for attendance. The flexibility we offer allows you to set up and manage multiple events concurrently on the Sticky Tickets platform.
To initiate the process of creating an event, it's imperative that you've completed the registration as an organiser. Once your registration is complete, you can delve into the process by either watching our quick demo or following the step-by-step guide outlined below:
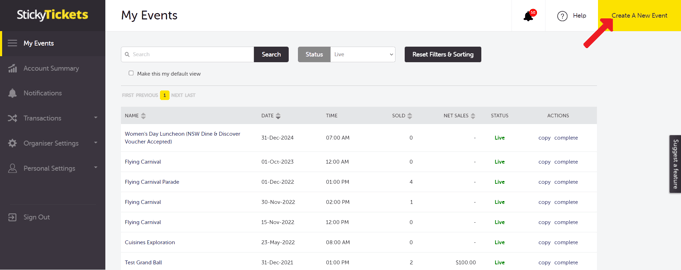
1. On the My Events page, click the Create A New Event button.
View on mobile devices:

2. Enter the Event Name. For Raffle/Giveaway events, check the box and then click the Create Your Event button.

3. Continue by entering various event details as prompted. Note that Orange sections are required before you can start selling tickets, while Blue sections are optional.
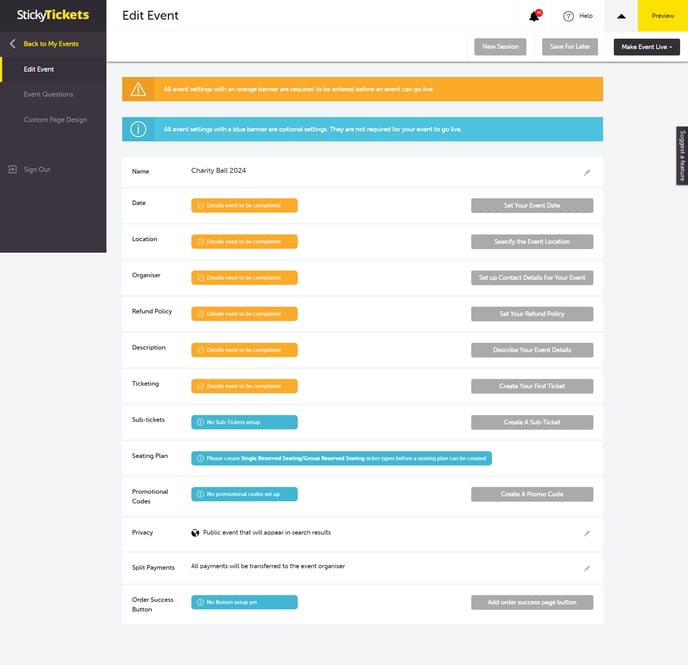
Below are the details of each section:
Event Date
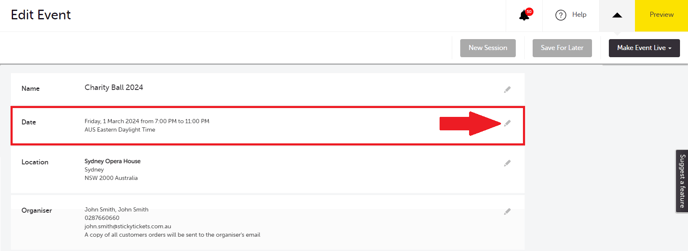
In this section, you need to enter the date and time (and timezone) for your event. You can also customise the time display and set the frequency of your event.
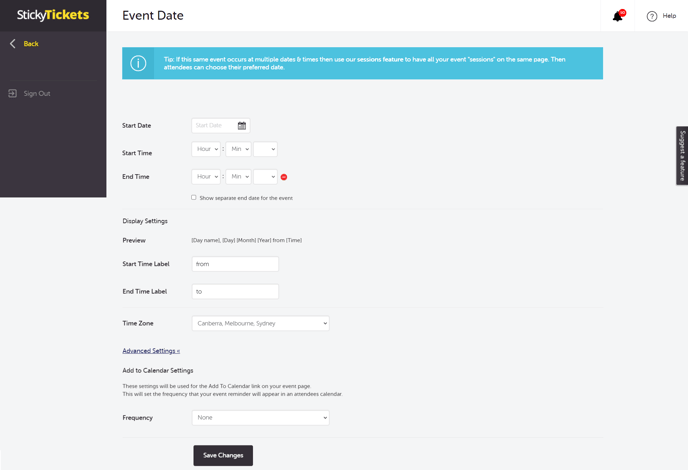
- Date: Enter the commencement date of your event.
- Start time: Choose the kick-off time for your event.
- End time: Select the conclusion time of your event.
- Show a separate end date for the event: Activate this option if your event spans multiple days, generating an additional date and time field.
- Preview: This will view a representation of how the date and time will be showcased on your event page. Customization options are available by clicking the "Customise Display" link.
- Customise Display link: This feature allows you to personalise the labels for start and end times, providing a tailored presentation.
- Time zone: Specify the timezone for your event, a crucial factor used in determining the event's start time.
- Advance Settings (Add to Calendar Settings): Set the frequency for your event reminder in attendees' calendars.
After you save these details, (SAVE CHANGES at the bottom of the page, as seen above) they will be displayed as shown in the image below. If you need to make any changes, you can click the edit icon or click anywhere in the section.
Event Location
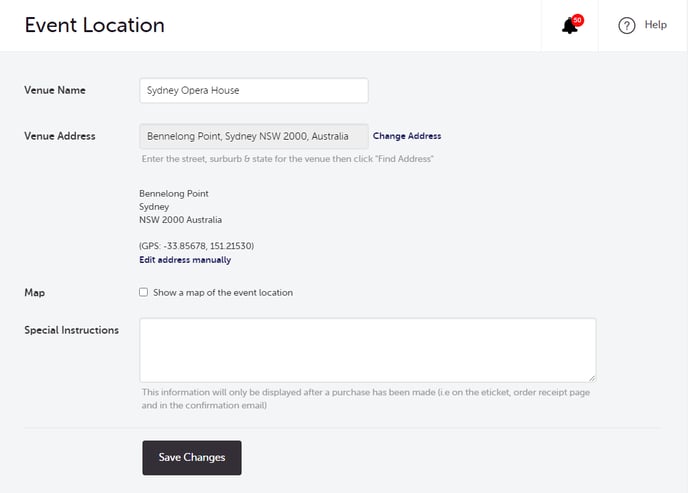
- Venue: Input the name of your event venue if applicable.
- Full Address: Provide the street address for your event, for example, "1 Kent St Sydney." Click "Find Address," and a list of matching addresses will be presented. Select your specific address from the list. A list of matching addresses will be shown – select your address from the list.
- Show Map: Tick this box to activate the display of a map showcasing your event's location on your event page.
- Edit address details: If necessary, click this option to manually edit your address details.
- Add additional information: Include any extra details here. This information will be visible on the confirmation email and e-tickets.
Click "Save Changes" to preserve the details in this section. Feel free to click anywhere within the section for any future edits.
Event Organiser
In this section, you enter the name and contact details of the event organiser. Any event enquires will be directed to this person.
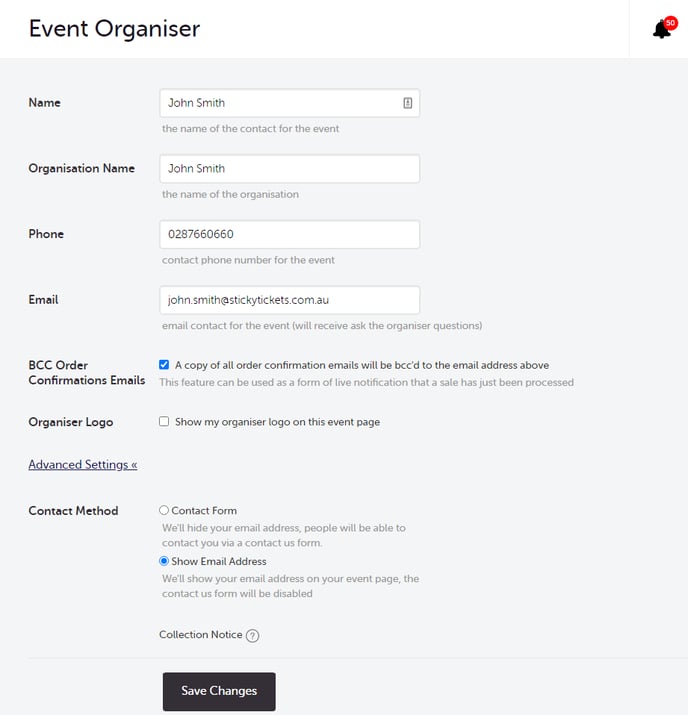
- Enter the Organiser’s name
- Enter the Organisation Name
- Enter the Organiser's Contact Number
- Email - Enter the email address where all event-related correspondence, including purchaser inquiries and order confirmation emails, will be directed.
- BCC Order Confirmation Emails - Opt to receive a copy of the confirmation email sent to ticket purchasers. While not essential for record-keeping, it serves as a real-time notification of recent sales. All purchaser information is conveniently accessible in the event admin area.
- Organiser Logo - Activate this option to display your organiser logo on your event page. Refer to the "Designing Your Own Organiser Page" for instructions on creating your organiser logo.
- Contact Method - By default, we use a contact form where ticket purchasers can submit inquiries, and we forward them to you via email.
- Show Email Address - Choose to display your email address as a clickable link on your event page. When selected, it will open the ticket purchaser's email client for direct communication.
- Click Save Changes to save this section.
Refund Policy
In this section, you need to specify your event's Refund Policy. This section is required and important to help you manage if there will be purchasers who will request refunds.
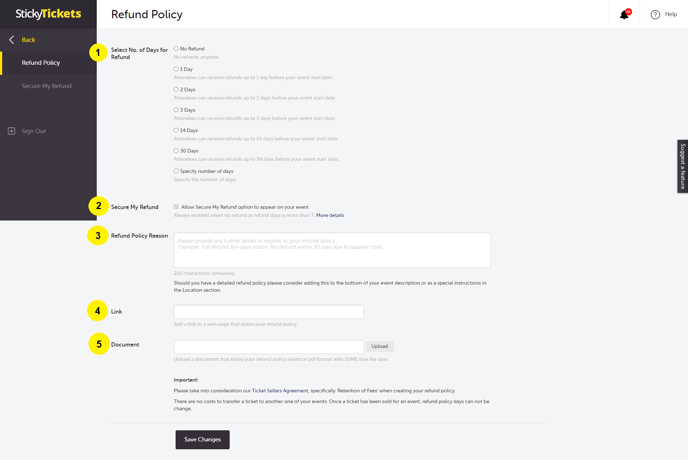
- Select the Time Frame For Refunds - Specify the time frame during which you will entertain and evaluate refund requests.
- Refund Protect Setting - This feature enables you to activate or deactivate Refund Protect for each event, aligning with your Refund Policy timeframe. Refund Protect is automatically enabled when the refund timeframe is set between 1-3 days and remains active when no refund or refund timeframe exceeds 3 days.
- Refund Policy Reason - Provide a concise explanation of your refund policy, offering clarity to potential ticket purchasers.
- Link - Include a link to an external website or page providing additional details about your refund policy.
- Document - Attach any relevant documents pertaining to the refund policy if required.
- Once done, click on the Save Changes button
Important Consumer Rights Note:
Under the Australian Consumer Law, ticket purchasers may have a right to a refund in circumstances where the event or service did not meet consumer guarantees. These rights apply regardless of the organiser’s stated refund policy and cannot be excluded or waived.
Event Description
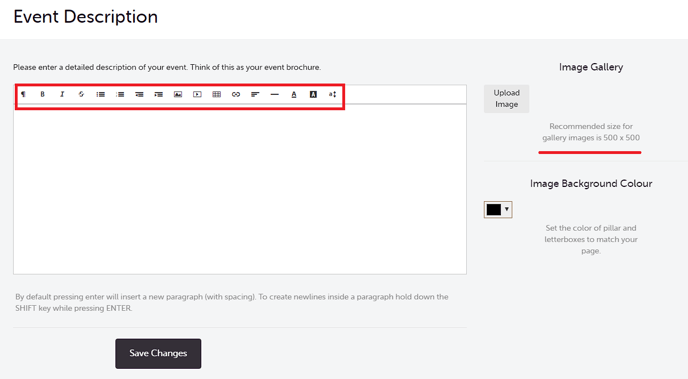
This section allows you to provide a comprehensive overview of your event. Crafting a detailed description and incorporating compelling images can significantly enhance your event's appeal.
Full Description: Enter all the vital details about your event in this space. Utilise formatting tools to customize the appearance of your event description. Feel free to upload images within the description - check out "I want to insert an image and video into my event description" for detailed instructions. A creative and informative description, including details about speakers/presenters, ticket inclusions, and the unique aspects of your event, can greatly contribute to ticket sales. You can even paste blurbs from a Microsoft Word document.
Images: Enhance your web page's visual appeal by uploading up to 3 images to be displayed alongside your event description. Note that these images are separate from those within the event description and will be visible in search results. Accepted formats include JPEG, PNG, and GIF.
Image Background Color: Customize or set the color of pillars and letterboxes to match your page, adding a personalized touch.
Save Changes: After completing your event description setup, click the "Save Changes" button at the bottom of the page to ensure all modifications are saved.
Tickets In this section you enter a list of available ticket types for your event and configure the ticketing options.
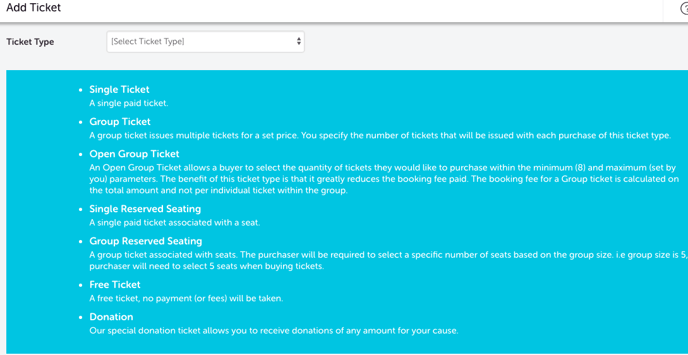
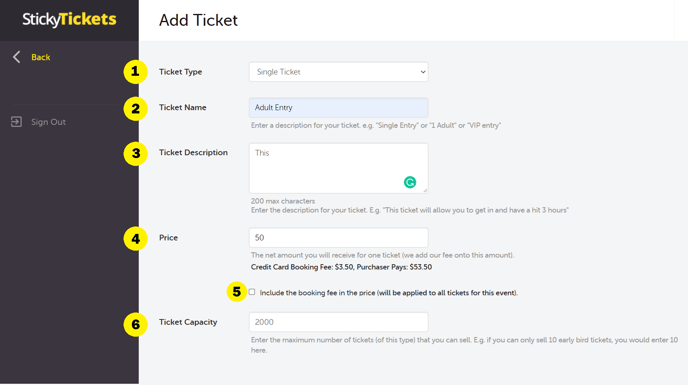
1. Ticket Type: Enter specifics for your initial ticket type, referring to on-screen prompts for guidance.
2. Ticket Name: Specify the name of the ticket that will be visible on the event page and e-ticket.
3. Ticket Description: Provide a concise description for the ticket type, offering additional information.
4. Price: Indicate the cost of the ticket. If your organiser settings include 'Registered for GST,' ensure you include the GST component in the ticket price. For details on organiser settings, please click here. This will display the booking fee amount and the final price received.
5. Include Booking Fee in the Price: Check this option if you want to incorporate the booking fee into the displayed ticket price.
6. Ticket Capacity: Define the quantity of tickets available for sale for this specific ticket type.

A. and B. Min and Max Per Order: Set the minimum and maximum number of tickets a purchaser can buy in a single transaction. Consider using this feature to offer discounts on bulk purchases.
C. and D. Start and Stop Selling: Define the dates for when the ticket type goes on sale and when ticket sales conclude. Opt for 'Straight Away' for tickets to be available as soon as your event goes live. Create an 'Early Bird' ticket type to encourage early sales, specifying a start time and an earlier end time for early bird pricing.
E. Show Tickets Remaining: Specify a threshold for ticket capacity. This will display on your event page, indicating the remaining tickets once unsold tickets reach this number or less. Leave this blank if you prefer not to show the number of tickets remaining.
F. Show Tickets Remaining (Event Level): Display the total number of tickets left for the entire event by setting a threshold. Leave this field blank if you choose not to show the remaining ticket count.
G. Sales Channel: Allows the option for ticket purchases to be only through online (event page) or through the Check-in app, or both.
H. Hide Ticket: If checked, the ticket remains hidden until a promo code is entered or if it's offered as a sub-ticket.
I. Distribute e-ticket: If selected, an e-ticket will be included as an attachment in the order confirmation email when a purchaser buys this ticket.
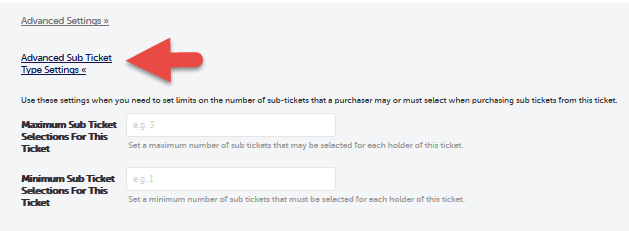
Advance Sub-Ticket Type Settings: In this section, organisers can set the number of sub-tickets that a purchaser may or must select when purchasing sub-tickets from this ticket.
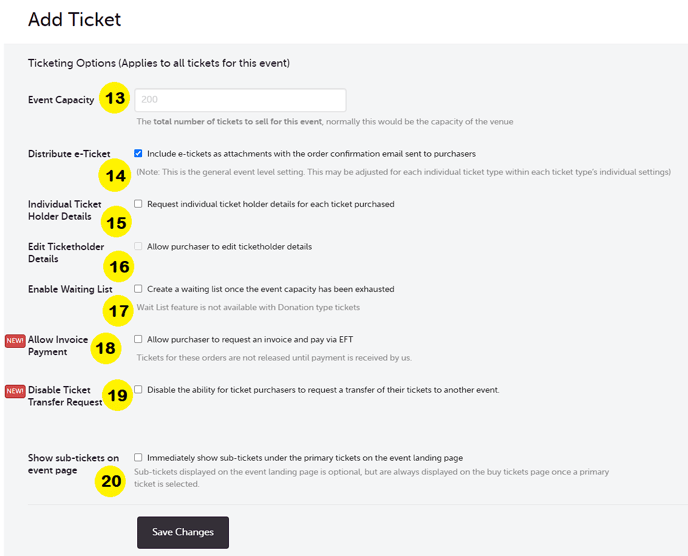
13. Event Capacity: Set the total number of tickets, encompassing all types, that can be sold for this event. Your event is deemed sold out when the total number of tickets sold exceeds this limit or when individual ticket limits are surpassed.
14. Distribute e-Tickets: If selected, an e-ticket will be included as an attachment in the order confirmation email when a purchaser buys this ticket.
15. Individual Ticket Holder Details: Allow ticket purchasers to provide individual names for each ticket bought. Useful for events like tables of ten. By default, the purchaser's name is entered, but they can allocate individual names if needed. Clarify in the event description if this is a critical requirement.
16. Edit Ticket Holder Details: Allow purchasers to edit ticketholder details through the My Tickets page.
17. Enable Waiting List: Choose to enable or disable the waiting list feature for each event. This feature allows attendees to join a waiting list when tickets are unavailable.
18. Allow Invoice Payment: Decide whether to offer the option of paying via Electronic Funds Transfer (EFT). Enable this feature to provide purchasers with an invoice and customizable payment terms for EFT transactions.
19. Disable Ticket Transfer Request: If selected, prevent ticket purchasers from requesting transfers for their tickets to another event.
20. Show Sub-Tickets on the Event Page: If applicable, set the display preference for sub-tickets associated with this ticket type. Choose to show them immediately or note their presence on the event page.
Note: For events with multiple ticket types, explore the Ticket Group Capacities feature. This allows organisers to group selected ticket types and set a combined group capacity. For more information on this feature, please click here.
Save your changes after configuring each setting to ensure they are applied effectively.
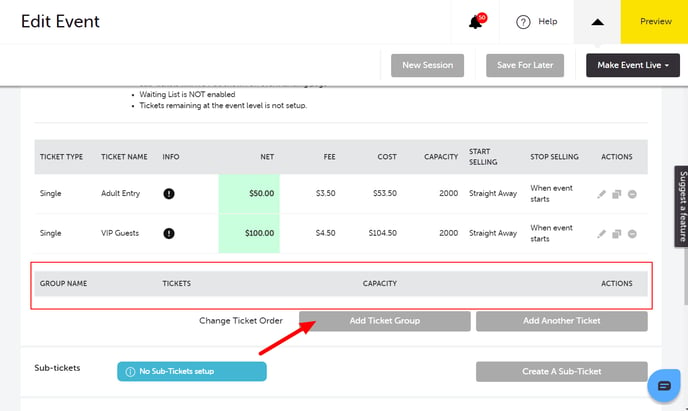
Sub-Tickets
Sub-Tickets are additional items/tickets that can be bought by a customer when purchasing tickets. They can be used to upsell or cross-sell a product or another event. A sub-ticket can only be purchased when a parent ticket has been selected to be purchased. You can set up this for a product or ticket up-selling. For more detailed information on how to set up sub-tickets, please click here.

Seating Plan
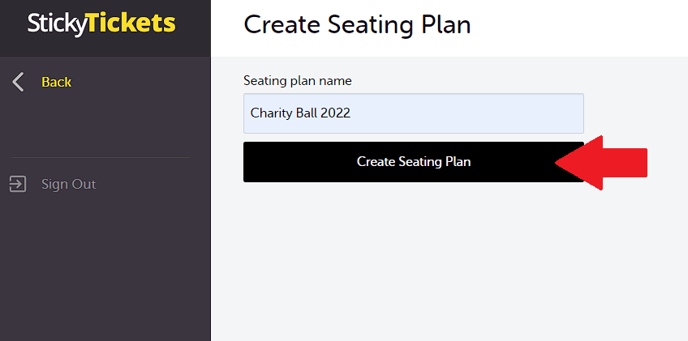
By default, this section is not required, however, if you use a Single or Ground Reserved Ticket type, this section will be required. This section will allow you to create a seating plan and allocate the ticket types to each seat for purchasers to select. For detailed instructions on how to set up a seating plan, please click here.
Promotional Codes
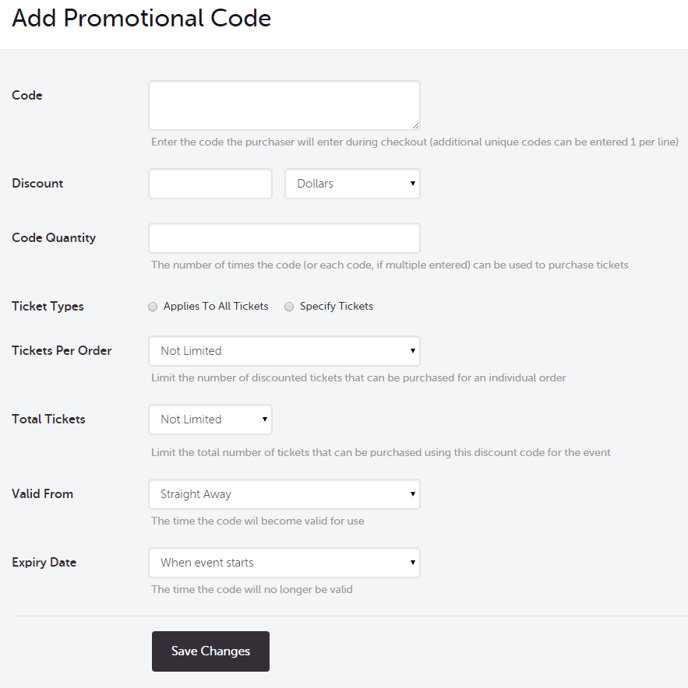
In this section, you can create promotional codes if you want to offer discounted ticketing to select individuals or groups.
Codes: Enter the details of your first code and use the on-screen hints to help you fill out each column. For more details click here
- If you need to add another promotional code click the Add Row link
- Select Save Changes
Privacy
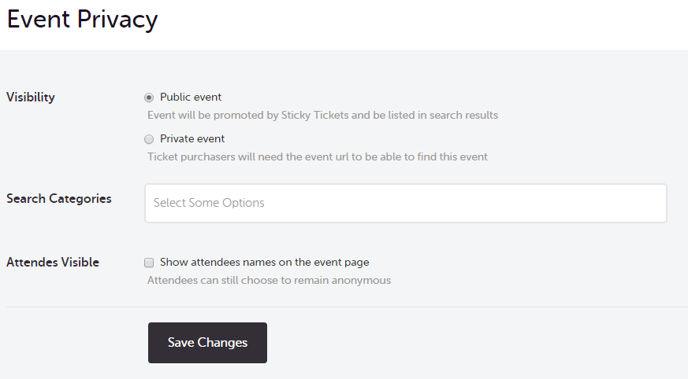
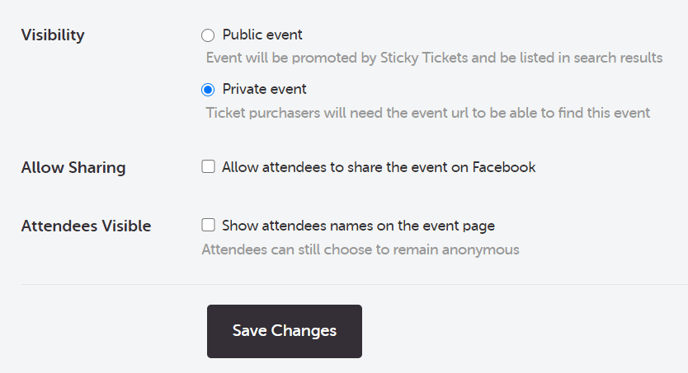
In this section, the organiser can set the event to either public or private.
Public Event:
- Promotion by Sticky Tickets: Public events are promoted by Sticky Tickets, discoverable via the event search feature, and indexed by Google, enhancing visibility on search engines.
- Accessibility: Ticking the checkbox makes your event easily accessible to anyone searching the Sticky Tickets site. They can view and purchase tickets directly.
- Search Categories (Public Event Only): Choose from a list of search categories to enhance discoverability, making it easier for people looking for similar events to find yours.
Private Event:
- Exclusive Access: Only those with the event URL, provided by you (displayed at the bottom of the event ad upon completion), can find and purchase tickets for private events.
- Allow Sharing (Private Event Only): Enable attendees to use the 'Share' feature on Sticky Tickets. They can 'Send To A Friend' and 'Like' or 'Share' on Facebook.
Additional Settings:
- Attendees Visible: If checked, a guest list will be displayed at the bottom of your event page. The ticket purchaser can choose to remain anonymous during the ticket purchase process, in which case their tickets will be listed as 'ANONYMOUS.'
These settings allow you to control the visibility and accessibility of your event, ensuring it reaches the right audience. Save your changes after configuring these options to apply them effectively.
Split Payments
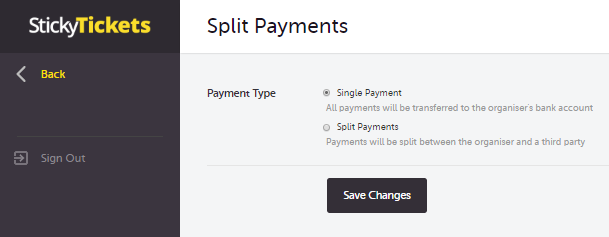
This feature is optional and can be used to split the ticket sales to the organiser and a 3rd party. By default, this will show as Single Payment where all ticket sales will be sent to the event organiser's bank details. To set up the split, select the Split Payments option.
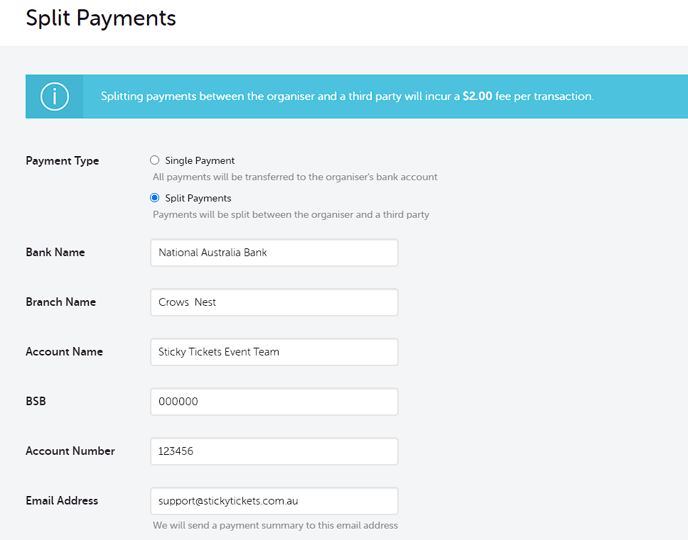
Enter the Banking Details (the email address entered will be sent a payment summary once the transfer has been made. The event organiser will also be sent a copy). For more information about setting up a split payment. please click here.
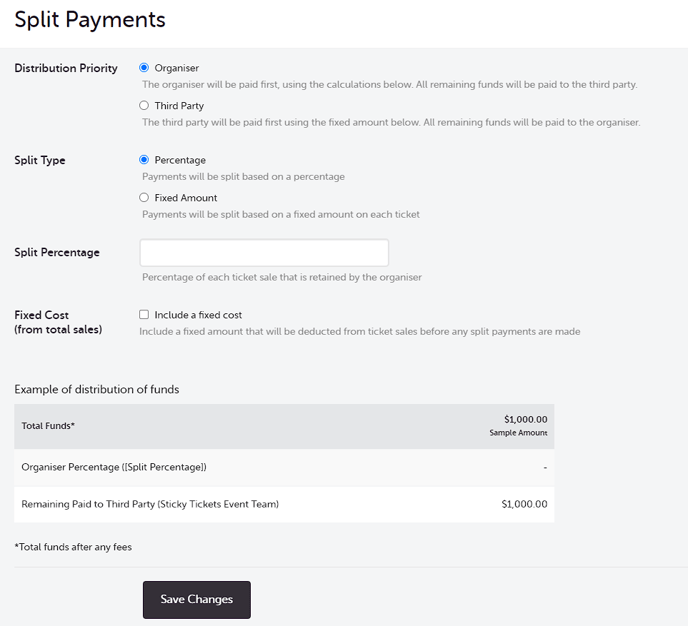
Enter the details of how you would like the payments to be split, then select Save Changes.
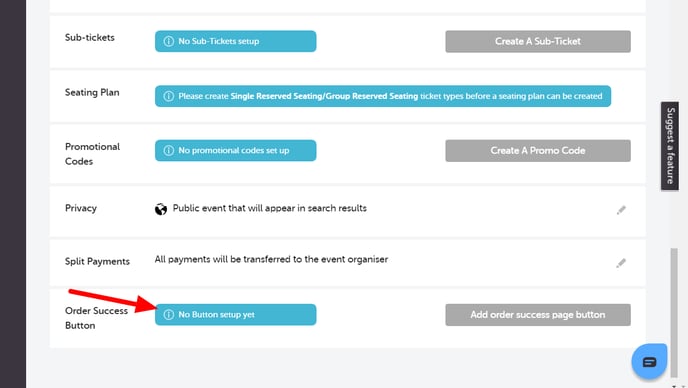
Order Success Button
This optional feature will allow you to add a button to the 'order success' page, and when clicked will direct you to a URL of your choice. The 'order success' page is displayed after every successful purchase/registration. To add this button to the order success page, go to the Edit Event page and scroll down to the bottom of the page.
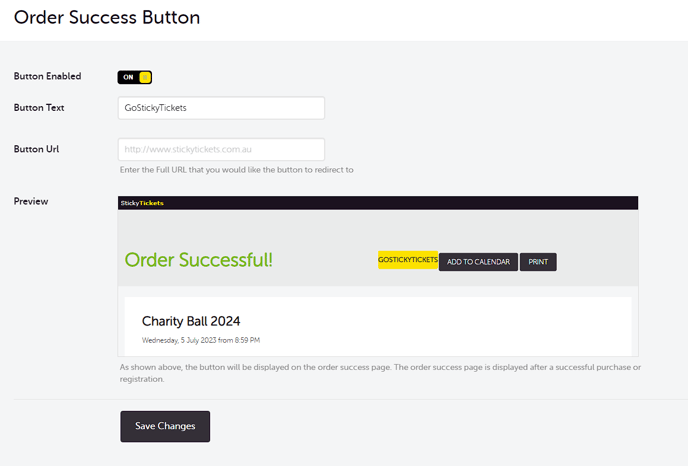
- Button Text - This allows you to enter the Button label.
- Redirect to Organiser Page - this checkbox will set the button to redirect the purchasers to your organiser page. Note: leave this checkbox unchecked if you want to use a different URL.
- Button URL - this is where you can enter a specific URL to where you want the purchasers to be redirected once they click this button. The URL must be a complete URL e.g. https://www.stickytickets.com.au/
Make Event Live
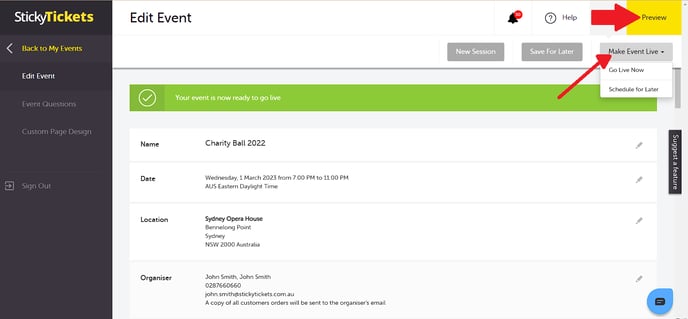
Event Status: Until your event is live, it will display a 'pending' or 'scheduled' status, indicating that it won't be visible online, and tickets cannot be purchased. During this phase, you can continue to make adjustments to your event details.
Save For Later: If you're not ready to make your event live, utilize the 'Save For Later' button to save your current changes and return to the event list page. Even after making your event live, you can still make certain changes. However, for modifications related to date, time, or location, please contact our support team.
Preview: Before making your event live, use the 'Preview' link to view your event page and ensure it looks just the way you want it.
Making Your Event Live: Click 'Make Event Live' and choose whether to make it live immediately or schedule it for a later time.

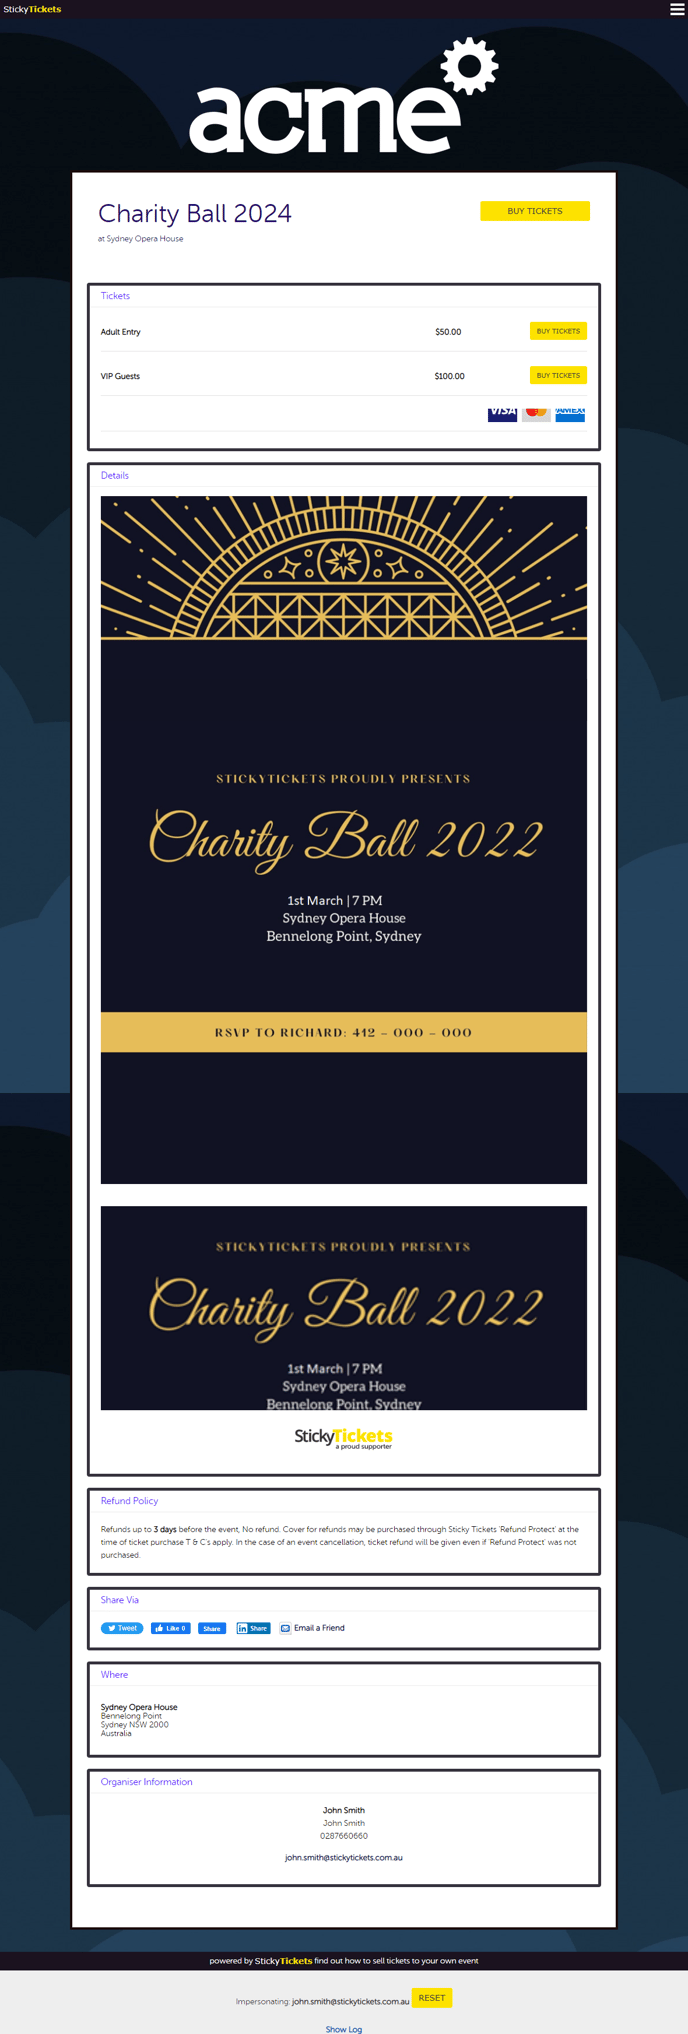
- Your event web page on Sticky Tickets will look similar to the example shown here when viewed on a mobile device.
If you have any further questions about creating your event or anything else, please don't hesitate to contact us at support any time and we'd be more than happy to help!
