This guide has three parts:
- Part 1 — Quick Start: Everything required to create a working event and start selling tickets.
- Part 2 — Advanced Features: Optional features to maximise your event's potential.
- Part 3 — Troubleshooting: Quick answers to common setup issues.
Before you start, make sure you have:
- Registered as an organiser and completed your basic account details
- Your event details are ready — name, date, time, location, images, ticket pricing
Part 1 — Quick Start
This covers only what's required to get your event live. Optional features (seating plans, sub-tickets, split payments) are in Part 2.
To create your event:
- Log in and go to My Events.
- Click the Create a New Event button(upper right corner).
- Enter your event name and click Create Your Event.
Your event editor will open. Orange sections are required before you can go live. Blue sections are optional.
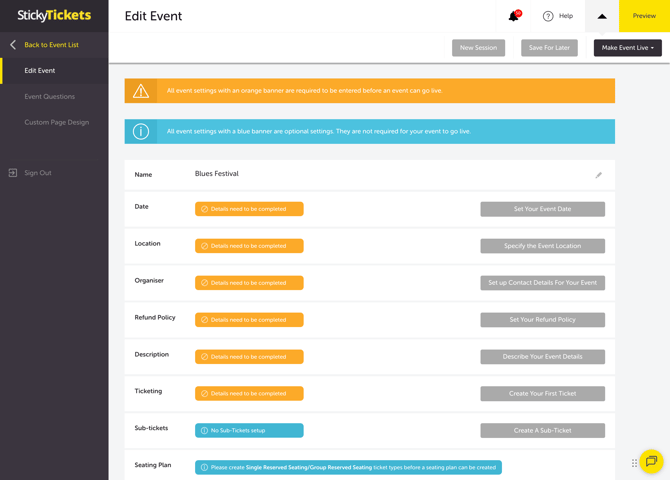
Your event editor is divided into sections. Orange sections are required before you can go live. Blue sections are optional.
1. Event date (Date and time)
Sets the date, time, and timezone shown on your event page. Also controls when ticket sales open and close.
|
FIELD |
WHAT IT DOES |
|
Start Date * |
The date your event begins. |
|
Start Time * |
The time your event starts. |
|
End Time |
The time your event finishes. |
|
Show separate end date |
Tick this for multi-day events - adds an end date and time field |
|
Timezone * |
The local timezone for the event. Always verify — affects displayed times and sale windows. |
|
Preview |
Shows how the date and time will appear on your event page |
|
Start / End Time Labels (Display Settings) |
Customise the label shown next to your times on the event page (e.g. change 'Start time' to 'Doors open'). |
|
Advanced Settings -Add to Calendar |
Sets the reminder frequency for the Add to Calendar feature. |
|
Advanced Settings - Custom Display Labels |
Controls how your event appears to ticket purchasers |
For more details on how to use the Add to Calendar settings, see How to Set Up Recurring Calendar Reminders for Your Event
For more details on how to set up custom display labels, see How to Customise Your Event Date and Time Labels
Tip: Running the same event on multiple dates? Use the Sessions feature — it lets ticket purchasers pick from all available dates on one event page.
2. Event location
The venue and address shown on your event page, confirmation emails, and e-tickets.
|
FIELD |
WHAT IT DOES |
|
Venue |
Name of the venue (e.g. Sydney Town Hall). Optional but recommended. |
|
Full Address |
Start typing and click Find Address. Select the correct address from the results. |
|
Show Map |
Displays a Google Map of your venue on the event page. |
|
Edit address details |
Manually correct any address fields after using the address search. |
|
Additional information |
Parking details, entry instructions, accessibility notes. Shown on confirmation emails and e-tickets. |
TIP: For online events, leave the address fields blank and include access details such as a meeting or webinar link in your event description or the Additional Information field.
3. Organiser details
Contact details shown to ticket purchasers on your event page. All enquiries are sent to the email address entered here.
|
FIELD |
WHAT IT DOES |
|
Name * |
The name of the event contact person. |
|
Organisation Name * |
Your company or organisation name. |
|
Phone * |
Contact phone number for the event. |
|
Email * |
Receives all enquiries and order confirmations |
|
BCC Order Confirmation Emails |
Tick to receive a copy of every order confirmation — useful as real-time sale notifications |
|
Organiser Logo |
Displays your organiser logo on the event page. The logo here is set up via Designing Your Organiser Page settings. |
|
Contact Method (Advanced Settings) |
Contact Form: your email is hidden, and purchasers submit enquiries via a form. Show Email Address: your email appears as a clickable link; the contact form is disabled. |
Tip: This section pre-populates from your organiser settings. You can override it per event if a different person is managing this event.
4. Refund Policy
Your refund terms are displayed on the event page and referenced in ticket purchaser communications.
Important: Once tickets have been sold, the refund policy days cannot be changed. Set this correctly before going live.
|
FIELD |
WHAT IT DOES |
|
Days for refund * |
How many days before the event you will accept refund requests. Options: No Refund, 1, 2, 3, 14, 30 days, or custom |
|
Secure My Refund |
Lets ticket purchasers add refund protection at checkout. Auto-activates when refund timeframe is No Refund or 1–3 days — and cannot be removed in these cases. When set to 4+ days, you can activate or deactivate it manually |
|
Refund Policy Reason |
A short explanation of your policy shown to ticket purchasers (max 271 characters) |
|
Link |
Link to an external page with your full refund policy. |
|
Document |
Upload a PDF of your full refund policy (max 10MB). |
For more on refund policy settings, see: How to set up your event's refund policy
Consumer rights: Under Australian Consumer Law, ticket purchasers may have a right to a refund if your event fails to meet consumer guarantees. These rights apply regardless of your stated refund policy.
Review the Ticket Sellers Agreement — specifically the 'Retention of Fees' section when writing your refund policy. There are no costs to transfer a ticket between your events
5. Event Description
Your event description is the primary sales tool on your event page.
|
FIELD |
WHAT IT DOES |
|
Full Description |
Full details about your event. Use the toolbar for headings, bold, bullet points, and links. You can paste directly from Microsoft Word. Include speaker or performer details, ticket inclusions, and key logistics. |
|
Images Gallery |
Up to 3 images (JPEG, PNG, or GIF) are displayed on the event page and in search results. Minimum recommended size: 1200 × 630px. |
|
Image Background Colour |
Sets the background colour for letterbox or pillar areas around your images. Match to your event branding. |
For embedding images or video inside your description, see: How to add images and video to your event description.
6. Tickets
Create the ticket types that appear on your event page. You need at least one ticket type before your event can go live.
|
TICKET TYPE |
USE THIS WHEN... |
TYPICAL EVENTS |
|
Single Ticket |
One ticket per purchase at a fixed price. |
Most events |
|
Group Ticket |
Fixed group size (e.g. table of 8) for one set price. |
Gala dinners, group bookings |
|
Open Group Ticket |
Buyer selects group size within your min/max. Booking fee is calculated on the group total — reduces per-person fee. |
Workshops, tours |
|
Single Reserved Seating |
Individual seat selection. Requires a seating plan. |
Theatres, ceremonies |
|
Group Reserved Seating |
Group purchase with assigned seats. |
Seated group events |
|
Free Ticket |
No payment taken. For free events or registrations. |
Community events, webinars |
|
Donation |
Buyer pays any amount. For fundraising. |
Charity events |
Ticket Fields
|
FIELD NAME |
WHAT IT DOES |
|
Ticket Name * |
Shown on the event page and e-ticket (e.g. General Admission, Early Bird, VIP). |
|
Ticket Description |
Optional short description (e.g. "Includes a welcome drink") |
|
Price * |
Ticket price in AUD. If GST-registered, include GST. The field shows the resulting Net, Fee, and Cost |
|
Include Booking Fee in Price |
Shows purchasers a single all-inclusive price. If unticked, the booking fee is added at checkout. |
|
Ticket Capacity * |
Maximum tickets of this type available for sale |
|
Distribute e-ticket * |
Tick to attach a scannable e-ticket to the buyer's confirmation email. Leave unticked only if managing attendance manually. |
Distribute e-ticket: If this is unticked, ticket purchasers will not receive a PDF e-ticket in their confirmation email. They may contact support, thinking something went wrong. Tick this for most events.
Booking fee tip: Tick "Include Booking Fee in Price" if you want ticket purchasers to see one all-inclusive price at checkout. If unticked, the booking fee is displayed as a separate line item and some ticket purchasers may be surprised by the total.
Advanced Ticket Settings
Advanced settings are only visible when creating your first ticket. For existing tickets, access these settings via the edit (pencil) icon in the ticket summary table
|
FIELD |
WHAT IT DOES |
|
Max Per Order |
Maximum tickets of this type a ticket purchaser can buy in one transaction |
|
Min Per Order |
Minimum tickets required per transaction |
|
Start Selling |
When this ticket goes on sale. Default: immediately when event is live. Set a future date for release schedules or Early Bird tickets |
|
When sales close. Default: when the event starts. Set an earlier date for time-limited pricing |
|
|
Displays a low-stock notice below the number you enter |
|
|
Displays a total remaining notice across all ticket types |
|
|
Sales Channel |
Where this ticket can be purchased: Both, Online only, or Check-in App only |
|
Hide Ticket |
Hides this ticket until a ticket purchaser enters a promotional code, or when configured as a sub-ticket |
Event-level ticket settings
|
FIELD |
WHAT IT DOES |
|
Event Capacity |
Total tickets that can be sold across all ticket types |
|
Individual Ticket Holder Details |
Allows ticket purchasers to enter a separate name for each ticket in their order. Enable this if you need to know who each individual attendee is (e.g. corporate bookings, allocated seating). If disabled, the purchaser's name appears on all tickets by default |
|
Edit Ticket Holder Details |
Allows ticket purchasers to update names after purchase via My Tickets |
|
Enable Waiting List |
Lets ticket purchasers join a waitlist when sold out |
|
Allow Invoice Payment (EFT) |
Allows ticket purchasers to request an invoice and pay by bank transfer |
|
Disable Ticket Transfer |
Prevents ticket purchasers from requesting ticket transfers to another event |
For help creating multiple ticket types, see: How to add and configure tickets for your event
7. Preview and Go Live
Click Preview (top right of the event editor) to see your event page exactly as ticket purchasers will see it.
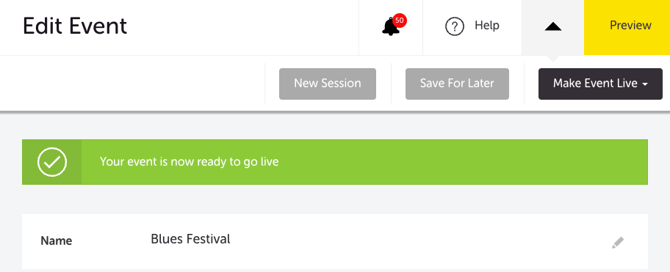
If all required sections are complete, you will see a green banner: "Your event is now ready to go live."
If the banner isn't showing, at least one required section is incomplete — check for any unsaved orange sections.
Before you click Go Live — read this:
- Event date, time, and location cannot be changed from the event editor once tickets are on sale. Contact our support team if you need to make these changes after going live.
- Changes to your refund policy will not apply to tickets sold before the change. Please ensure your policy is correct before you make the event live.
Click the Make Event Live button and choose:
- Go Live Now — publishes immediately
- Schedule for Later — set a future date and time for automatic publishing
Not ready yet? Click Save For Later. Your event will be listed as Pending in My Events and is not visible to the public.
Event statuses at a glance:
|
STATUS |
MEANING |
|
Pending |
Draft — not visible to buyers, tickets cannot be purchased. |
|
Scheduled |
Set to go live at a future date. Not yet visible to buyers. |
|
Live |
Published and selling. Visible to the public. |
|
Sold Out |
All tickets sold. The waiting list option is shown if enabled. |
Part 2 - Advanced features
These features are optional but can improve your event's performance.
8. Sub-tickets
Add-on items ticket purchasers can purchase alongside a parent ticket — for example, merchandise, meal packages, or parking. A sub-ticket only appears to ticket purchasers who have selected the linked parent ticket.
To create a sub-ticket, click Create A Sub-Ticket from the ticket management screen.
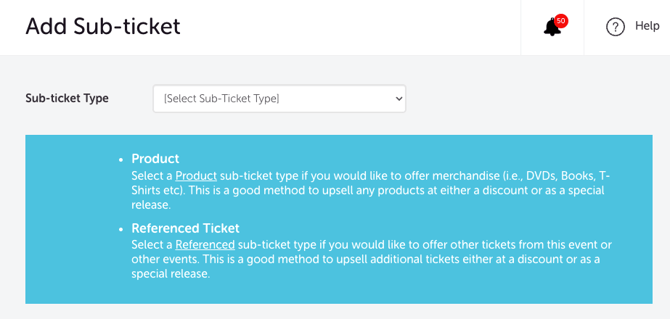
For full instructions, see: How to set up sub-tickets to sell add-ons and cross-sell event tickets.
9. Seating Plan
Required only when using Single Reserved Seating or Group Reserved Seating ticket types. Allows ticket purchasers to select specific seats from an interactive venue map.
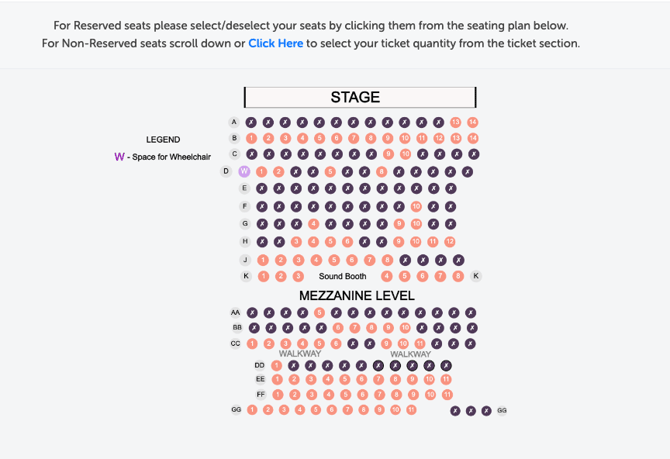
For full instructions, see: How to create and publish a seating plan for your event.
10. Promotional codes
Create discount codes for selected ticket purchasers — members, sponsors, staff, or early registrants. You can enter multiple unique codes at once (one per line).
Code quantity field: When setting up a promotional code, the "Code Quantity" field sets how many times each individual code can be used. Set this to 1 for single-use codes, or a higher number for codes you want to be reusable (e.g. a staff discount code used by multiple people).
For full instructions, see: Step-by-step guide to creating promotional codes for your event.
11. Event Privacy
Controls who can find your event page. If set to Private, the event will not appear in search results on stickytickets.com.au, but can still be accessed via a direct link.
For more information, see: How to control your event's visibility on Sticky Tickets.
12. Split Payments
Automatically divides ticket revenue between you and a third party at payout — for example, a charity partner, co-organiser, or venue.
Important: Split payments incur a $2.00 fee per transaction. Factor this into your ticket pricing before enabling.
For full instructions, see: How to split ticket revenue between bank accounts.
13. Order Success Button
Add a custom button to the Order Successful page that ticket purchasers see immediately after purchase. Use this to direct attendees to another website related to your event.
For more information, see: How to add a redirect button to the Order Success page.
14. Event Questions
Collect custom information from ticket purchasers at checkout — for example, dietary requirements, t-shirt sizes, or emergency contacts. Access from the left sidebar of your event editor.
For full instructions, see: How to create and manage custom questions for your event.
15. Custom Page Design
Customise the visual appearance of your event page with colours and branding. Access from the left sidebar of your event editor once your event is live.
For full instructions, see: How to customise your event page design.
Part 3 — Troubleshooting and Common Questions
Quick self-check if your event won't go live:
- Is there a green "Your event is now ready to go live" banner? If not:
- Check Event Date — filled and saved?
- Check Refund Policy — a refund option selected and saved?
- Check Tickets — at least one ticket created?
If all three are complete and the banner still isn't showing, contact our support team.
Why won't my event go live?
-
Cause: One or more required (orange) sections are incomplete or unsaved. Fix: Look for the green "Your event is now ready to go live" banner. If it's absent, check each orange section and confirm it has been saved. The Refund Policy and Tickets sections are the most commonly incomplete.
Can I create a free event?
-
Yes — use the Free Ticket type. No payment is taken from ticket purchasers.
What is the booking fee, and who pays it?
-
Sticky Tickets charges a booking fee per ticket sold. By default, this is added on top of your ticket price and paid by the ticket purchaser. To show a single all-inclusive price instead, tick "Include Booking Fee in the Price" on the relevant ticket type.
I'm running the same event next month — do I need to set it up from scratch?
-
No. Use the Copy Event feature to duplicate your existing event. Update the date and time, and adjust any other details as needed. For more detailed instructions, see How to copy an existing event
What happens to ticket purchasers if I cancel my event?
-
All ticket purchasers will receive a refund. For a more detailed information about cancelling events, see How to Cancel Your Event and Refund All Ticket Purchasers
What image size should I use?
-
At least 1200 × 630px in JPEG, PNG, or GIF format.
Where did my advanced ticket settings go?
-
Cause: Advanced ticket settings are only visible when creating your first ticket. Fix: Click the edit (pencil) icon next to any existing ticket to access and update these settings.
Can't find a draft event?
-
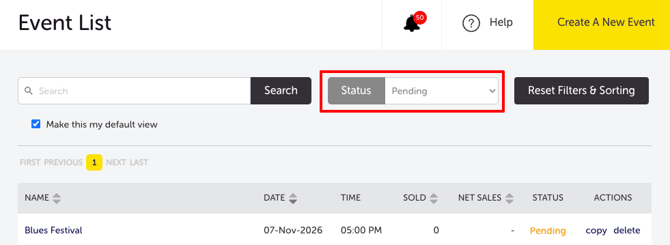
Draft events are not listed under Live Events. Go to My Events and filter by Pending or Scheduled status.
A ticket type isn't showing on the event page
-
Check all of the following:
- Has the Start Selling date passed?
- Is Hide Ticket unticked?
- Does the ticket still have remaining capacity?
- Is the event status Live?
Can I change the event date, time, or location after going live?
-
No — these fields cannot be edited from the event editor once tickets are on sale. Contact our support team to make these changes.
What happens if I update the refund policy after tickets are sold?
-
You can update the number of refund days at any time. However, changes only apply to new ticket purchases. Tickets purchased before the change continue to follow the original refund policy.
Why did Secure My Refund switch on or off automatically?
-
Secure My Refund auto-enables when the refund timeframe is set to 1–3 days, or when no refund/over 3 days is selected. You can manually toggle it on or off in the Refund Policy section.
Ticket purchasers are confused by the booking fee
-
Tick "Include Booking Fee in the Price" on the relevant ticket type. Ticket purchasers will then see one all-inclusive price at checkout with no separate booking fee line item.
Need more help?
If you need help creating your event, contact our support team.