Sticky Tickets offers a free Check-in app, available on the iTunes Store and Google Play Store.
This app allows you to effortlessly scan e-tickets at various entry points using your preferred digital device, expediting the entry process. Here are some key advantages:
- Wireless ticket scanning with Android and iOS devices
- Easy validation of ticket barcodes using your device's camera
- Look up and check-in attendees from a list, searchable by first name, last name, email, or by browsing the list
- Streamline check-in time with a 'Check-in All' feature, automatically checking in all tickets under one booking
- Simultaneously check-in attendees using multiple devices
- Real-time viewing of attendance statistics
Compatible devices include iPhone 4s or newer, iPod Touch, iPad, iPad Mini, and Android Devices version 2.2 and up.
IMPORTANT: When downloading the Check-In application for the first time, grant the application all necessary permissions, including access to your device's Camera. Failure to do so will render the Check-In application non-functional, as it uses the device's camera to scan tickets and QR codes.
Ensure your device has a minimum of 50MB of free memory.
If you have already installed the application and haven't allowed camera permissions, [click here](link to support page) to view a support page on enabling camera permissions on your iOS device. The Check-In application requires camera permissions for ticket scanning.
Once the app is successfully installed, follow the steps below to set up an Event Operator:
Setting up an Event Operator:
You can add a check-in operator at either the Event or Global level.
- Global Operators have access to view all your current and future events through the app.
- Event Level Operators can only view the events you've provided access to.
For instructions on setting up a Global operator, click here
For Event level operator setup, follow the steps below:
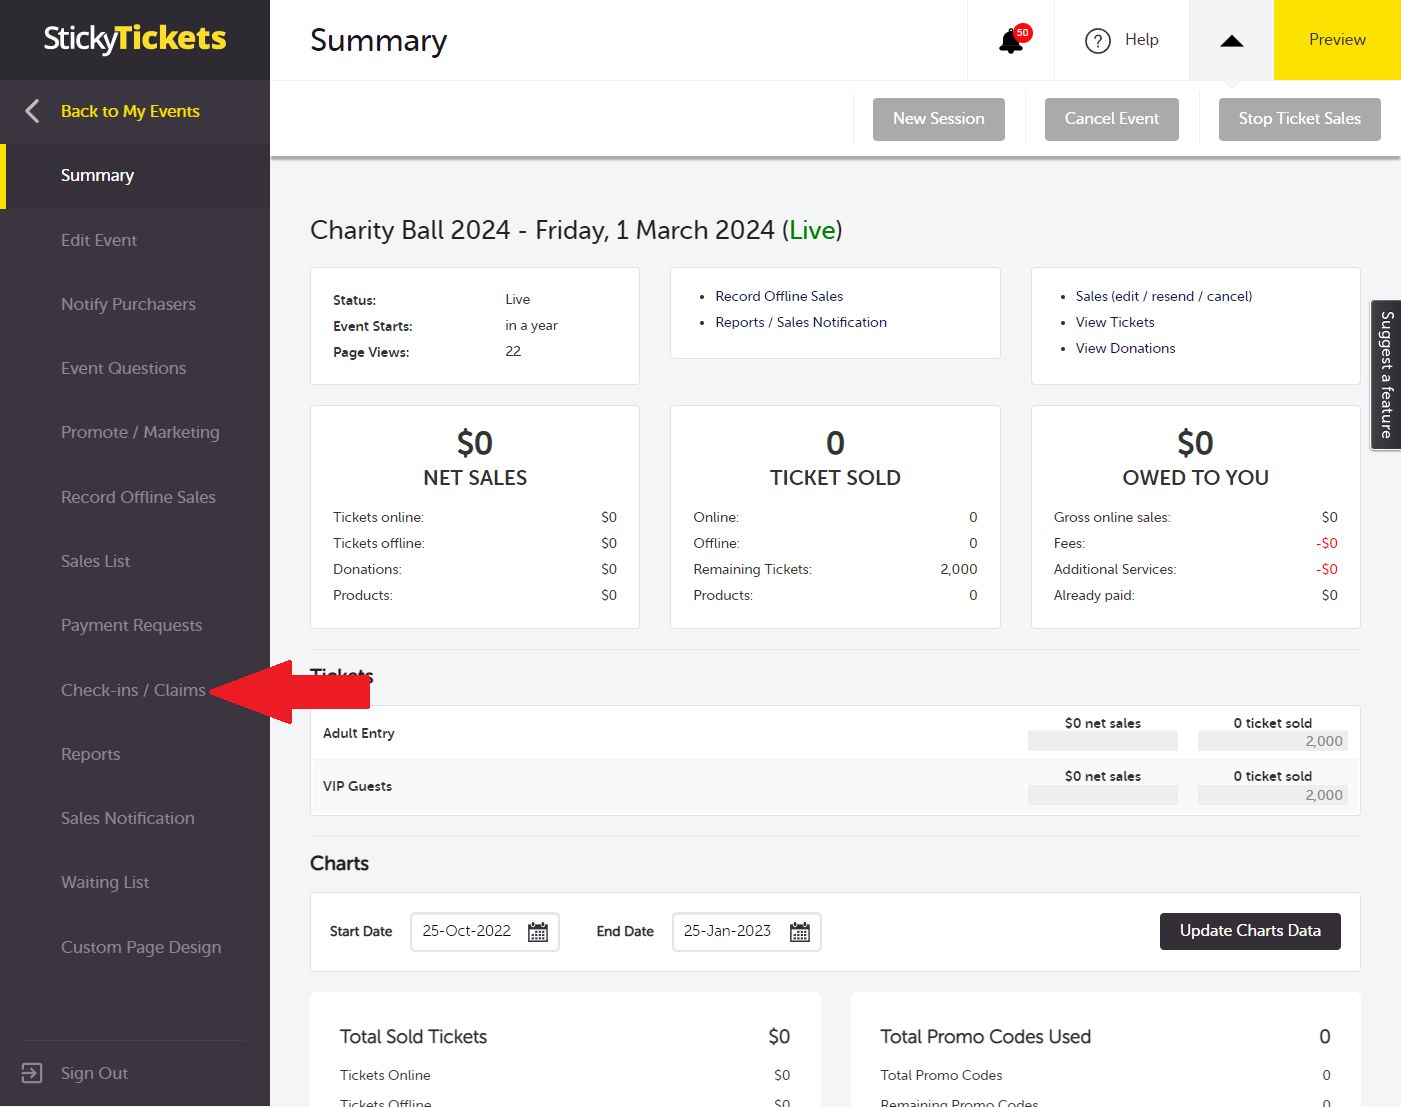
- Log in to the Sticky Tickets website and select the event you'd like to use the check-in app for.
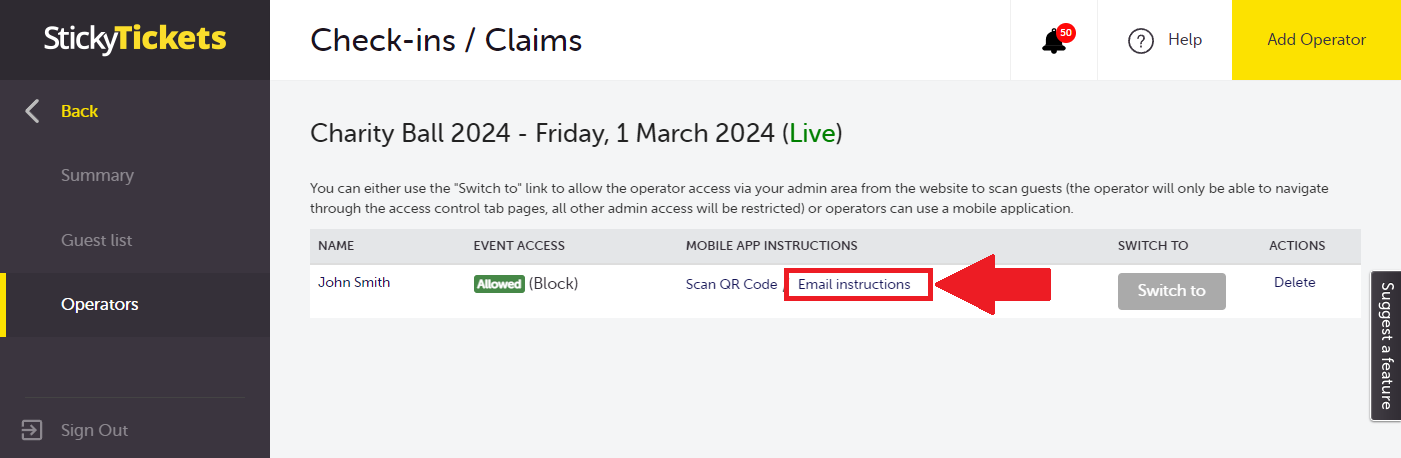
- Click on the Check-ins/Claims tab.
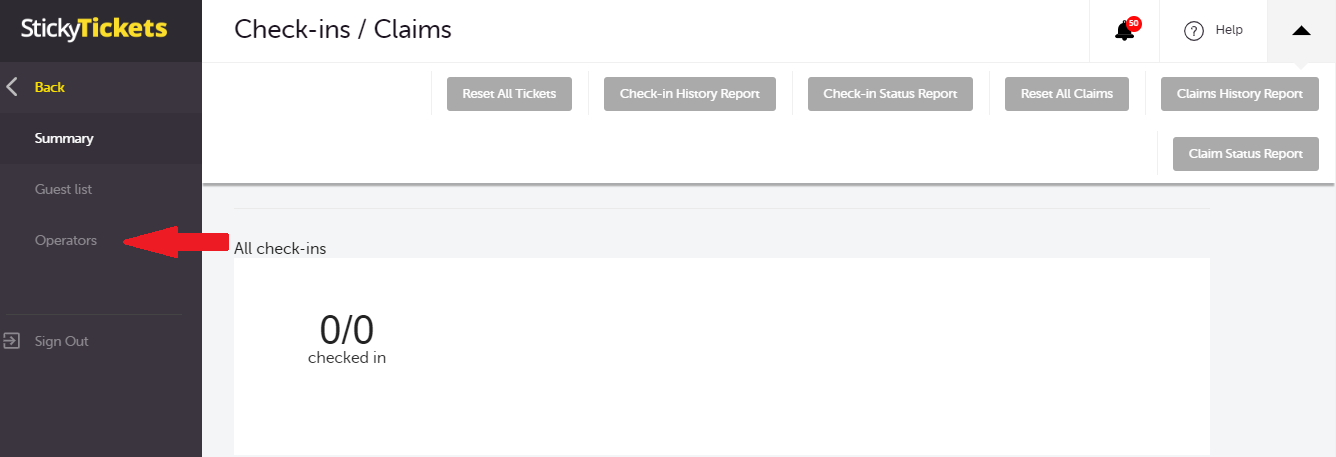
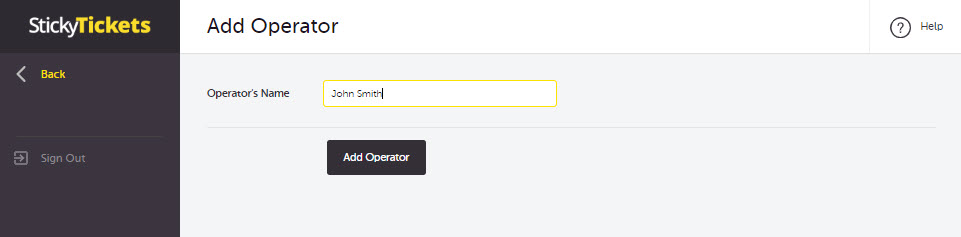
3. Select the Operators tab link then Add Operator button

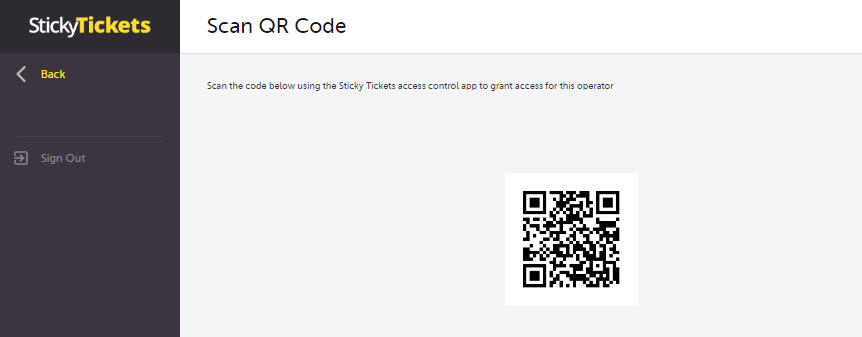
5. You have 2 options, you can either scan the QR code if you have the device that you are using to scan tickets with you
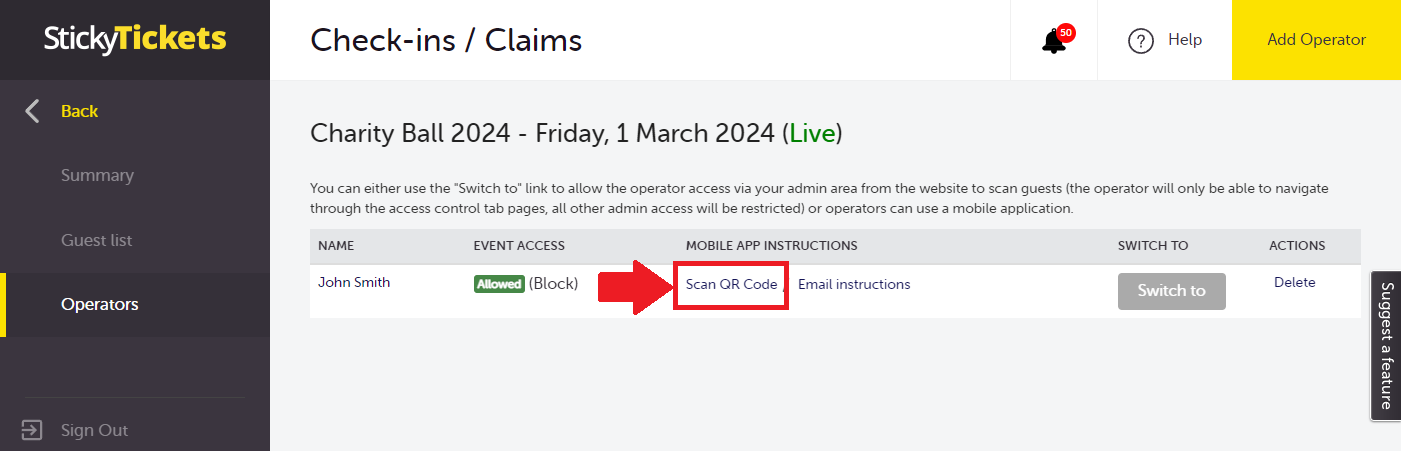
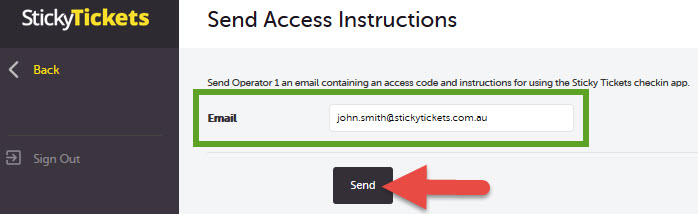
Or send the instructions and link to your email address
EMAIL ACCESS INSTRUCTIONS
Follow these steps if you've received an email with instructions on accessing the event.
Note: Before proceeding, ensure that you've already installed the app on your device. You can do so by clicking on the following link from your device (iOS) and (Android).
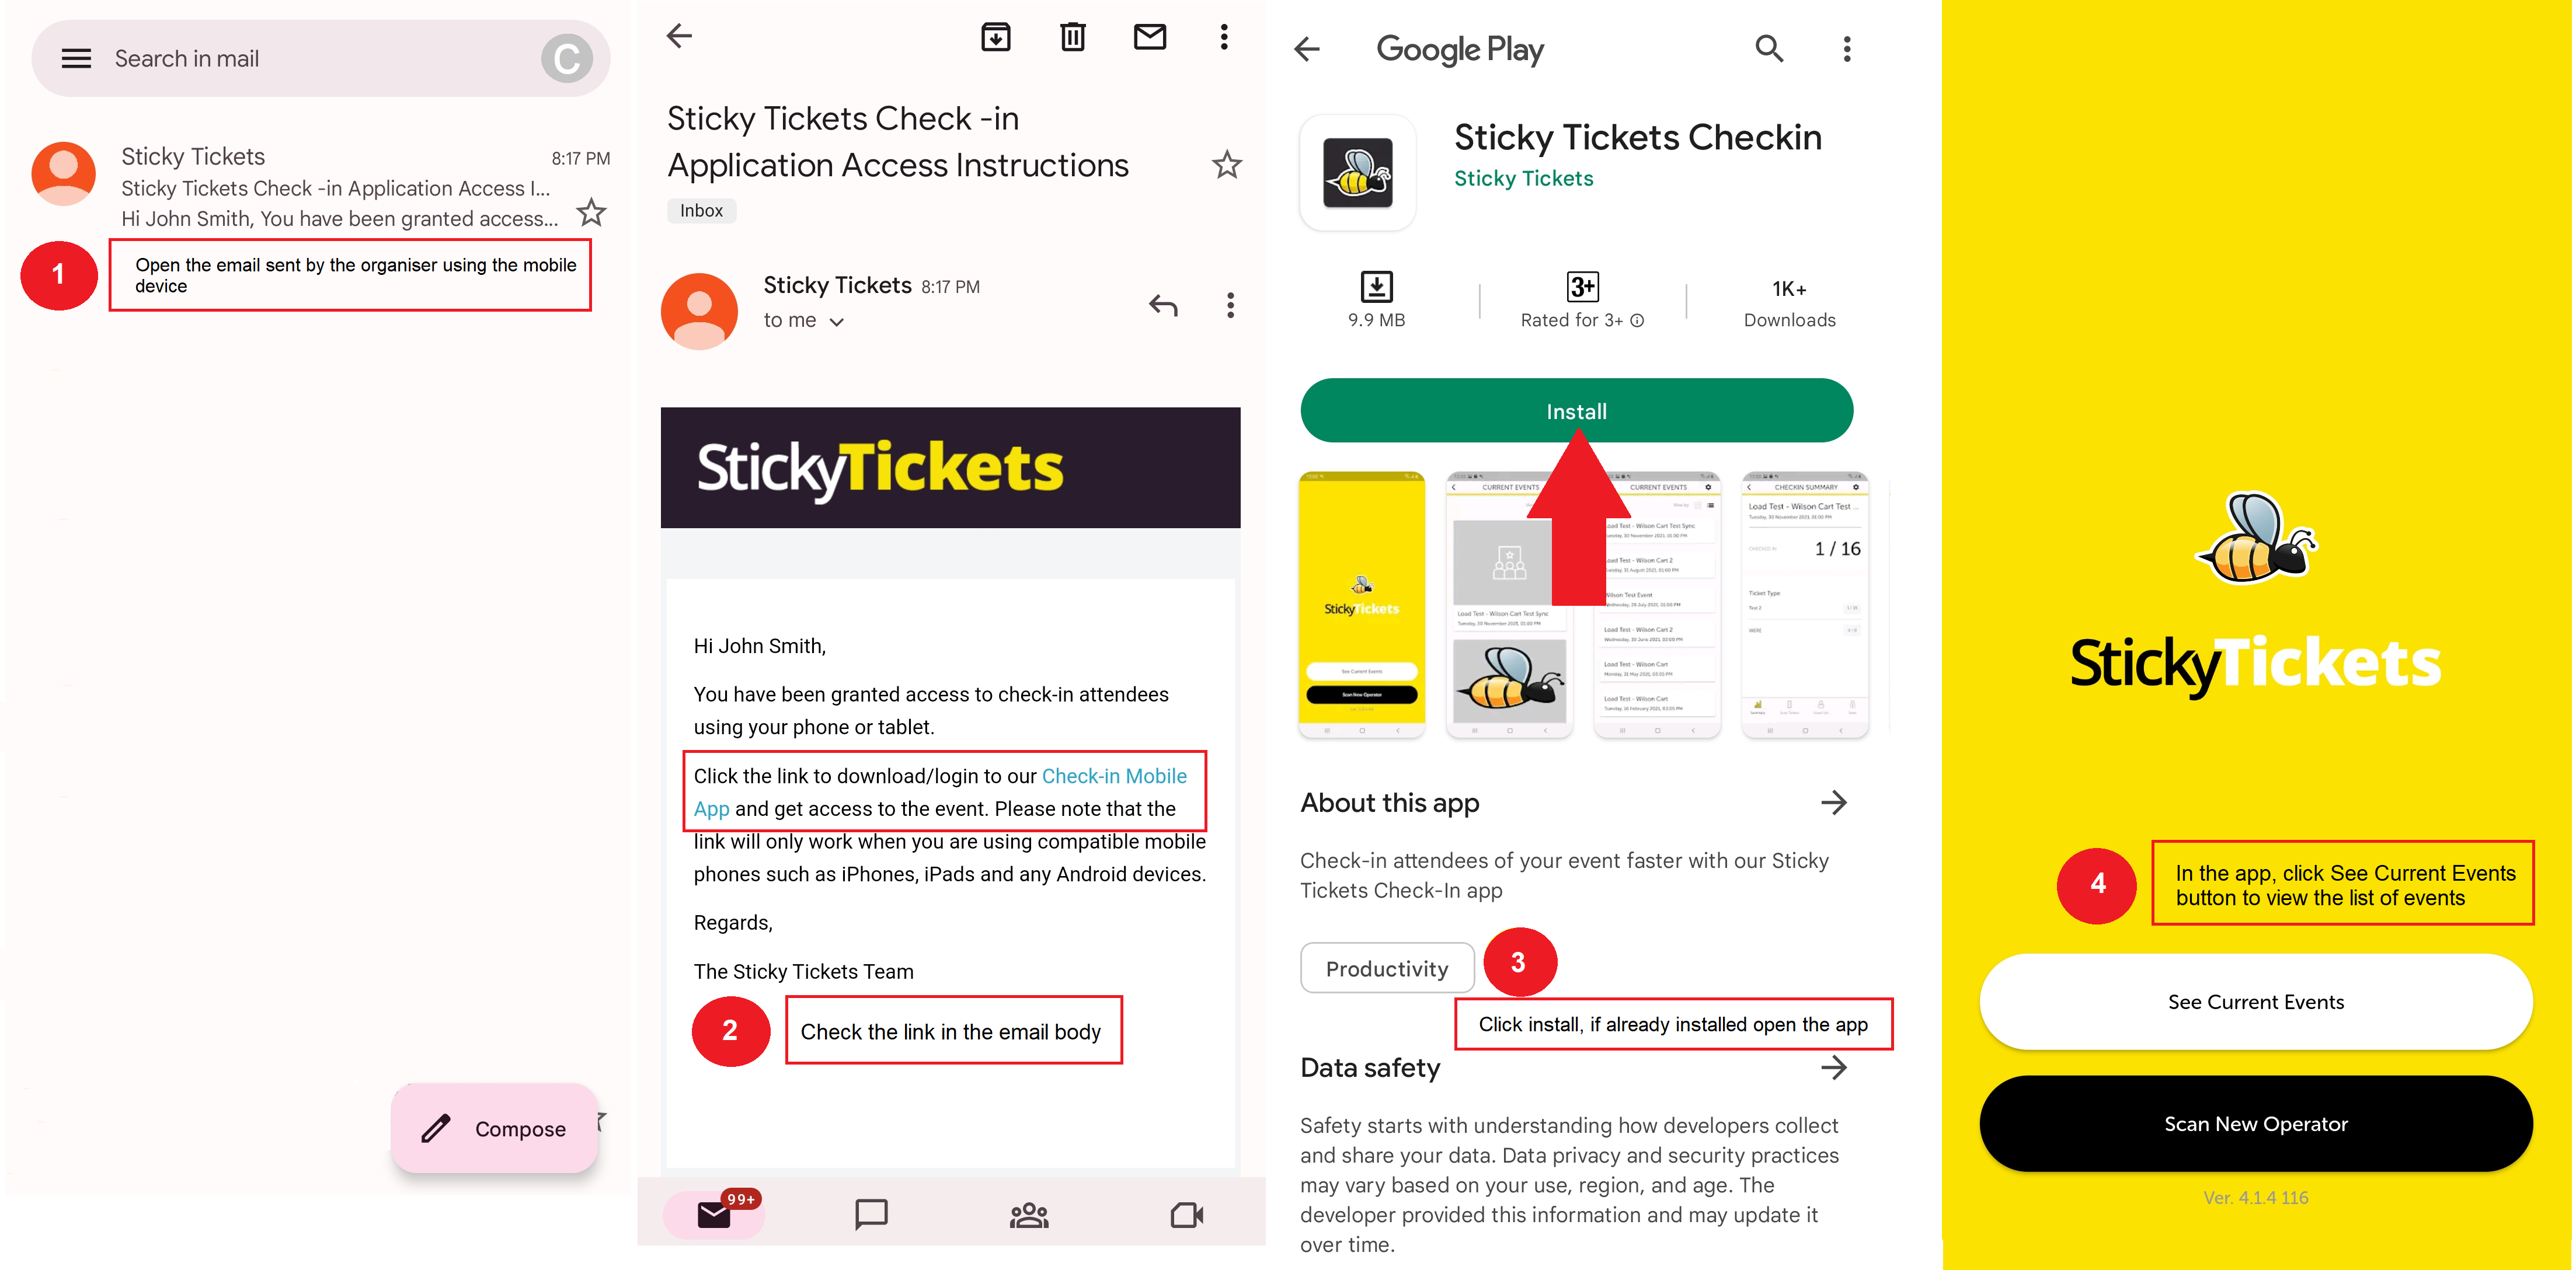
- Open the email on the device you'll use for attendee check-ins on the event day.
- Click on the link within the email.
- Your device will prompt you on how to complete this action; choose any internet browser.
- This will direct you to an internet page with the options to "Install App" or "Launch App & Access Event."
- Click on "Launch App & Access Event" (remember, the app must be installed).
- The app will open, loading your event.
Note: The link in the email granting access to the event can only be used once; this prevents uninvited users from accessing the event.
Advanced Features
-
Block Operator: This indicates that the operator has been set up but lacks access to the event and cannot check-in attendees.
-
Allow Operator: This signifies that the operator has access to the event and is ready to check-in attendees.
-
Switch To: Utilize this feature if you wish to enable an operator to check in attendees directly from the web browser. For more details, refer to the support pages on Checking In Attendees.
Check-In App Settings
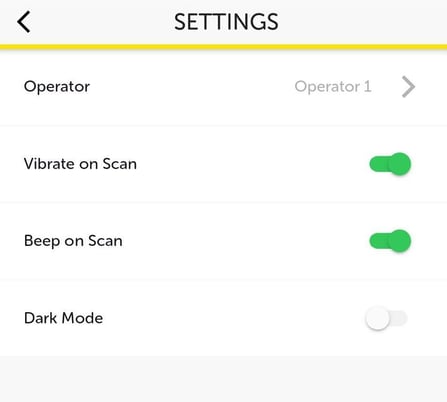
- Vibrate on Scan: Your device will vibrate with each scan.
- Beep on Scan: Your device will emit a beep for each scan.
- Dark Mode: Switch to a dark theme to potentially reduce power usage and enhance visibility.
To view the list of current events, select the back button located at the top left of the screen.
On the Event Day - Checking In Attendees and Other Functions
-
If you haven't been granted access to the event, kindly contact the event organiser for access or to set up an operator click here.
-
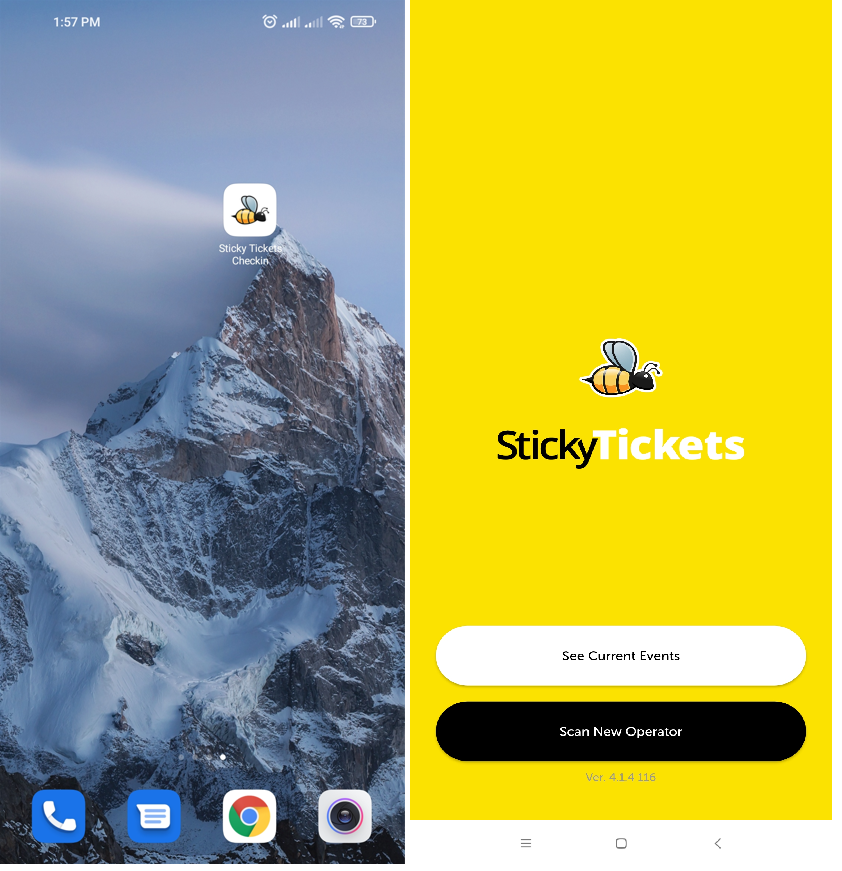
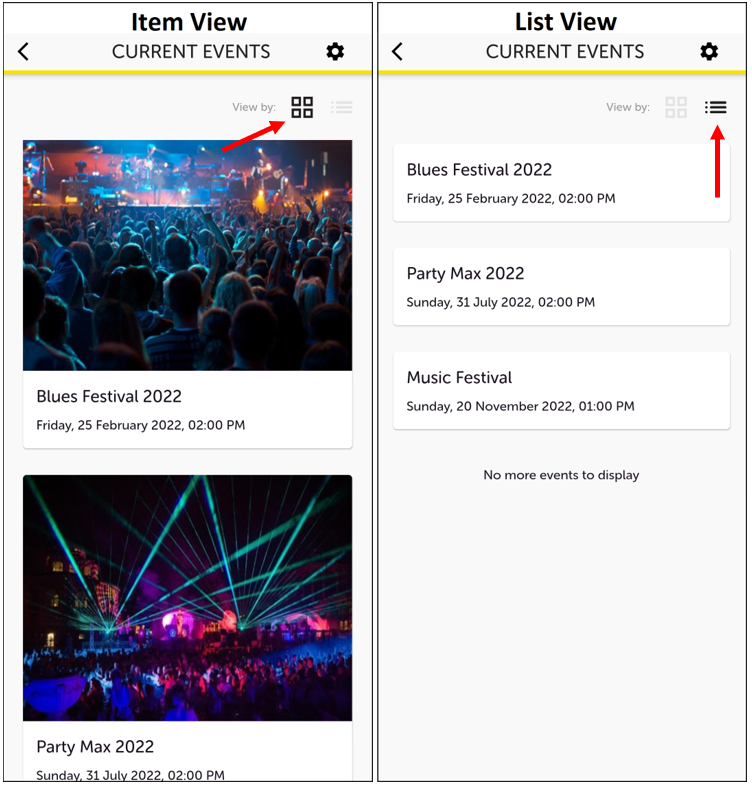
Open the app on your device, click "See Current Events," and select the desired event. (Note: that larger events may take more time to download event information.)
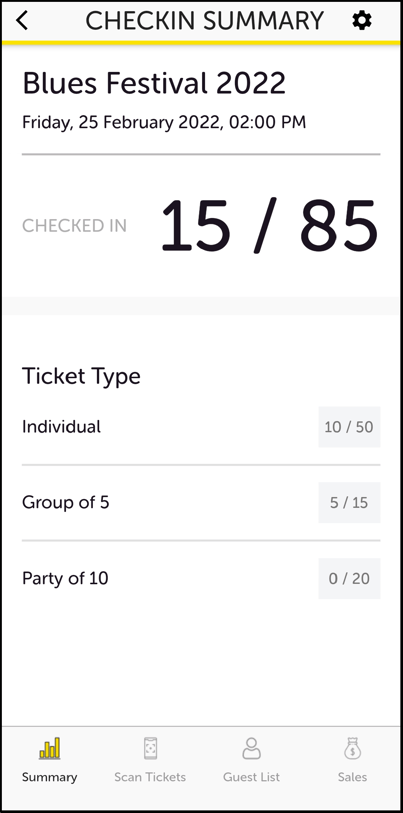
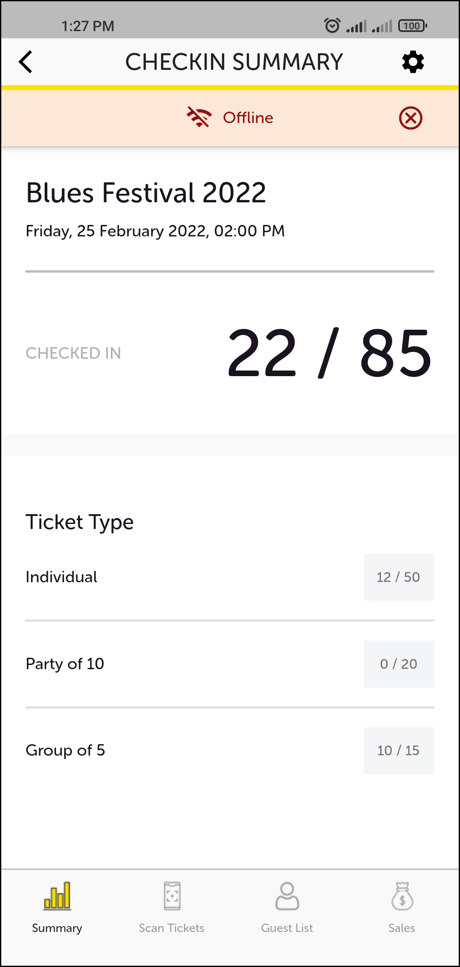
Summary Screen - provides an overview of checked-in and unchecked tickets, displaying the number of tickets for each type and the breakdown of checked-in versus unchecked. At this stage, you can proceed to scan tickets using the Scan screen, manually search and mark attendees off from the Guest List page, or handle sales on the Sales screen.
Scan screen - Point the device camera at the QR code or barcode (you can also scan off mobile devices).
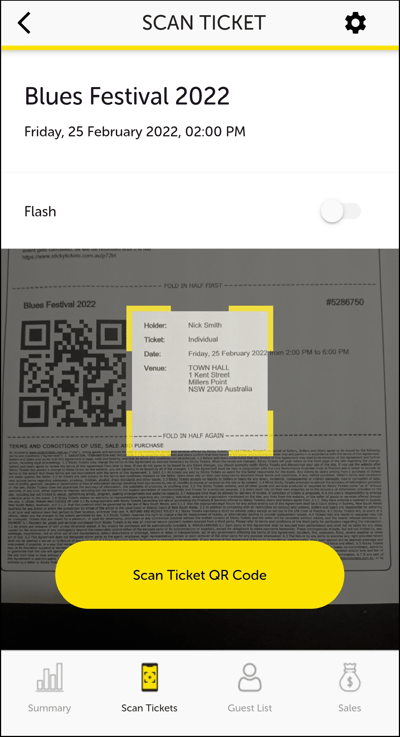
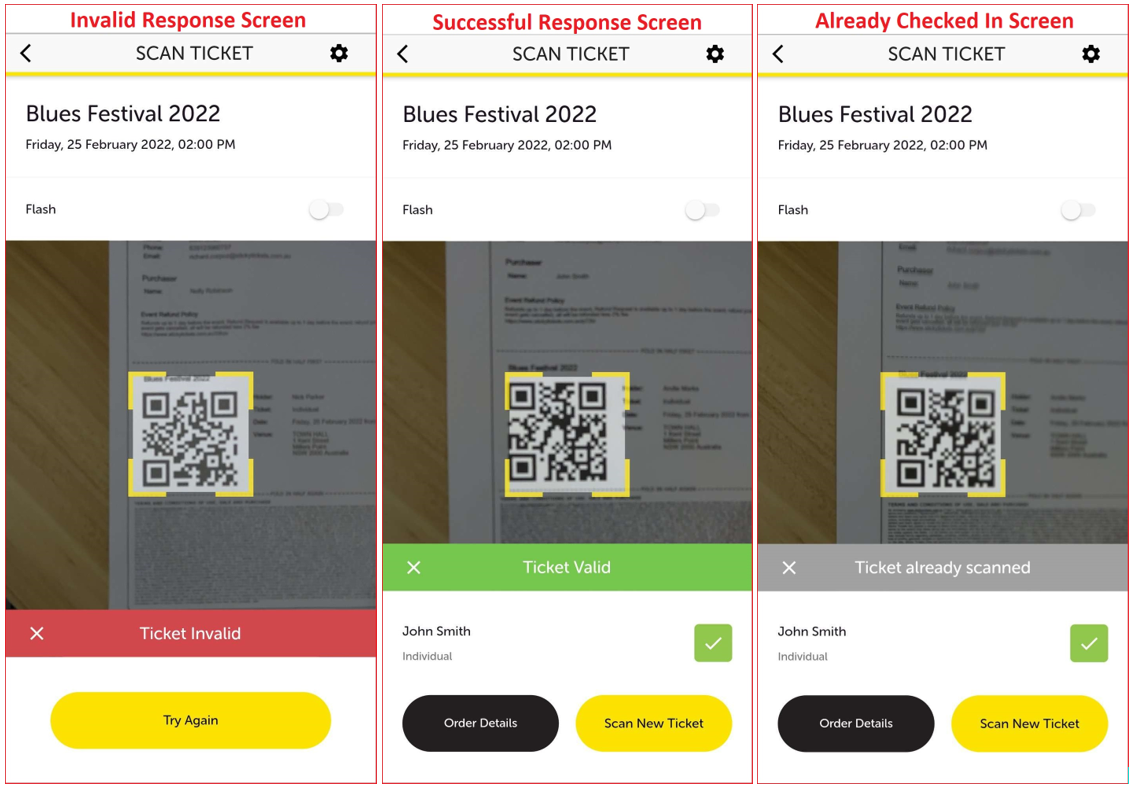
Upon scanning a ticket, you will receive one of the following responses:
-
Invalid Code: The scanned code does not correspond to this event.
-
Success (one long beep): The scan was successful, and the guest had been checked in. Tip: If the guest is with others who have tickets from the same order, you can tap on the Order Details button to efficiently check in the remaining guests without rescanning their tickets.
-
Already Checked In: This ticket has already been scanned.
Notes
If you're scanning a code from a receipt or email and the purchase includes multiple ticket sales, the next screen you'll encounter is the order page. On this page, you'll have the option to conveniently mark off any other guests on the order without scanning their tickets. If all guests from the order are present, you can tap on "Check-in All." If the sale includes only one ticket, it will automatically be checked in.
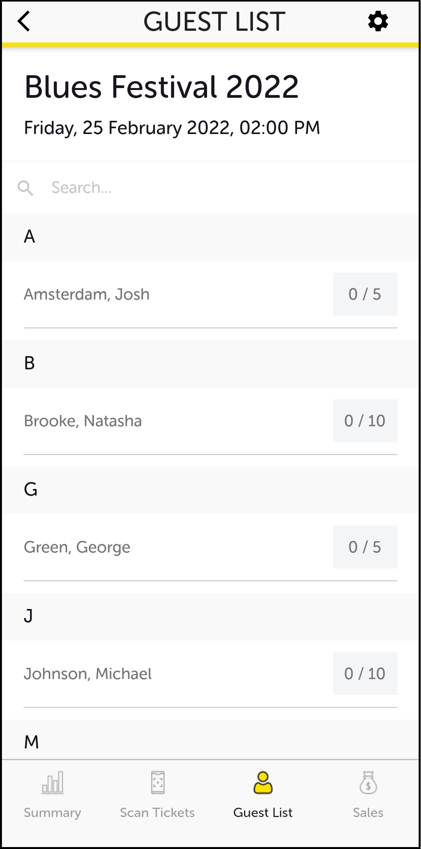
Guest List Screen:
You can search for attendees or mark off attendees on this screen. Search for tickets using the purchaser or ticket holder's name (first or last name), and email address, or by scrolling through the list. Utilize the alphabet at the top of the screen to refine your search.
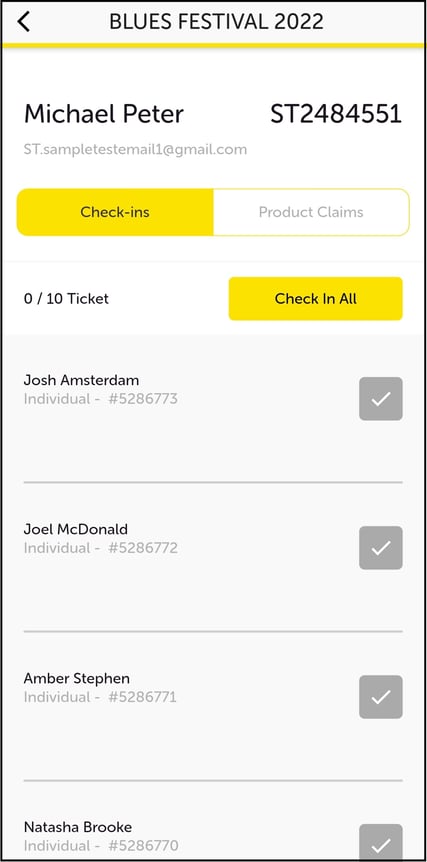
Marking Off Attendees - When you have found the order/sale, simply tap on the attendee. If it has several tickets to the order a new screen will appear listing all the tickets attached to the order- you can either mark off individually or select Check-in All
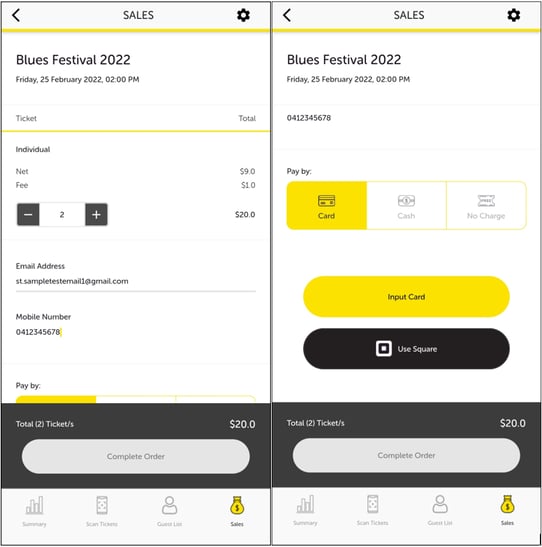
Sales Screen
Take payments directly within the app, whether it's cash, credit card, or a no-charge transaction. Enter the details manually during the payment process. If an email address is provided, we will use it to send the purchaser a receipt copy. In case a mobile number is provided, the purchaser will receive an SMS (text message) containing a link to their receipt.
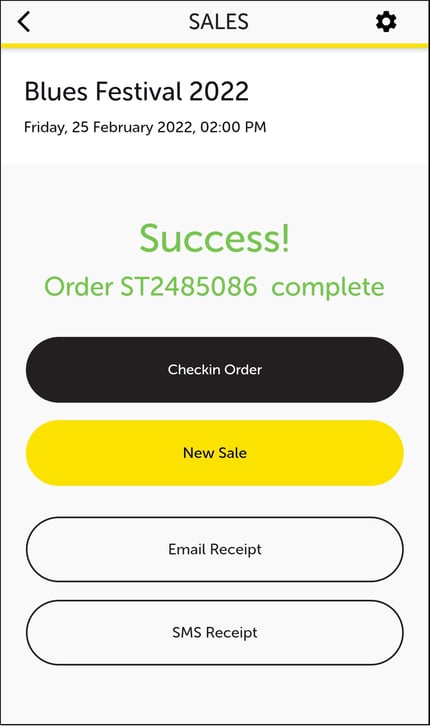
Once you have successfully processed a payment you will have the option to Check-in Order or process a New Sale
Tips:
To choose which tickets you want to display on the app, navigate to your individual ticket settings page in your event admin area. You can also opt to showcase specific ticket types exclusively on the app. Adjust this in the ticket settings page in your event admin area using the 'discount code required' setting. This will conceal the ticket online but make it accessible on the app. This feature is handy if the ticket price is higher at the door.
Offline Mode:
The app is designed to function optimally even in areas with no mobile reception, assuming you've already added an operator and downloaded the tickets for your event when there was a mobile or internet connection.
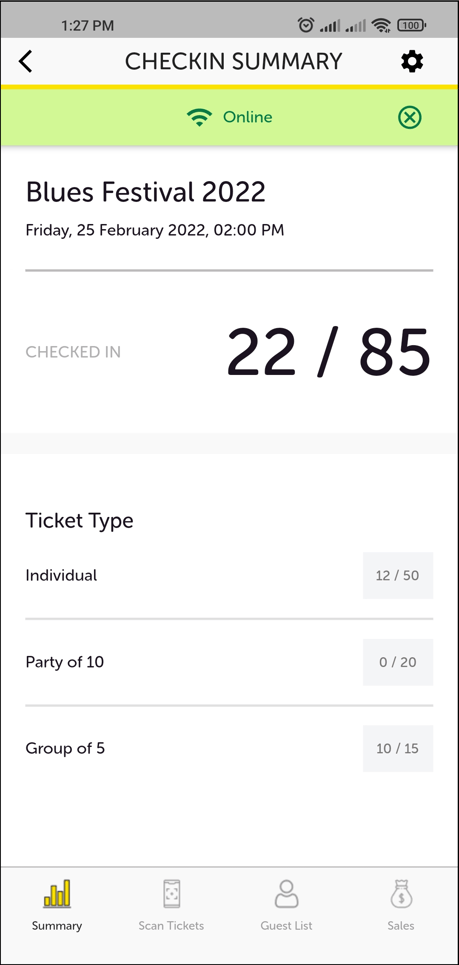
The app will save and store all checked-in tickets. When the device regains mobile range, it will automatically synchronize all data with the event database and other check-in devices.
Offline Mode Notice Bar
Successfully synced notice bar
Using Your Device's Flash
If your device is equipped with a flash and you find yourself in a poorly lit environment, you can enhance the lighting on the scan screen by activating the flash. To do this, select the flash icon located in the top-left corner. Please note that using the flash may deplete your battery charge more quickly, so ensure your device is either plugged into a wall socket or has a spare battery on hand.

Operator Settings / Add Operator
To modify the settings for an operator or add a new operator to the device, follow these steps:
- Go to the Summary tab.
- Use the back button located at the top left of the screen.
- You should now find yourself on the Current Events page.
- Select the cog icon positioned at the top right.
- If you wish to adjust operator settings, you can do so on this screen. Once done, use the back button at the top left to return to the Current Events page.
- To add a new operator, select the + icon.
- Scan the QR code for the desired operator. For more details, follow the steps at the top of this page.
- After adding an operator, you can modify the settings or choose the back button at the top left to return to the Current Events list.
If you have any questions about the check-in app or anything else, please don't hesitate to contact us any time and we'd be more than happy to help.