Once you've finished setting up your event, you can publish it immediately or schedule it to go live at a specific date and time. Until your event is live, it shows as Pending or Scheduled — tickets cannot be purchased and the event is not visible to the public.
Before you go live
Make sure all required sections of your event are complete. You'll know your event is ready when a green banner appears at the top of the event editor:
"Your event is now ready to go live."
If this banner isn't showing, at least one required section is incomplete or unsaved. Check each orange section in the event editor — the most commonly incomplete sections are Refund Policy and Tickets.

How to publish your event
Step 1 — Preview your event page
Click the Preview link at the top of the event editor to see exactly how your event page will appear to ticket purchasers before going live. Check that all details — date, time, location, ticket types, and pricing — are correct.
Step 2 — Click Make Event Live
When you're ready, click the Make Event Live button in the event editor.
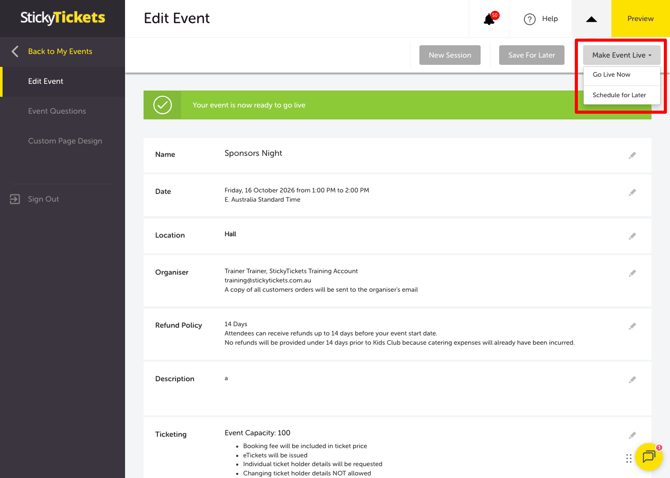
Step 3 — Choose when to go live
A prompt will appear with two options:
- Go Live Now — publishes your event immediately. Ticket purchasers can find it and purchase tickets right away.
- Schedule for Later — set a specific date and time for your event to go live automatically. Your event will show as Scheduled until that date.
Click Confirm to apply your choice.
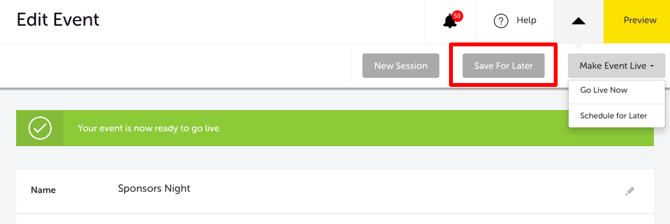
Not ready to go live yet?
Click Save For Later to save your progress and return to My Events. Your event will show as Pending — it is not visible to the public and tickets cannot be purchased. You can continue editing it at any time.
Event statuses explained
|
STATUS |
WHAT IT MEANS |
|
Pending |
Draft — not visible to ticket purchasers. Tickets cannot be purchased. You can continue editing. |
|
Scheduled |
Set to go live automatically at a future date and time. Not yet visible to the public. |
|
Live |
Published and selling. Visible to anyone searching for your event. |
|
Sold Out |
All tickets have been sold. The waiting list is shown if enabled. |
Most common scenarios and questions
The Make Event Live button isn't showing — or the green banner isn't appearing.
-
At least one required section is incomplete. Check each orange section in the event editor and confirm it has been filled in and saved. The most commonly missed sections are Refund Policy and Tickets (you need at least one ticket type created).
I scheduled my event but it didn't go live at the right time.
-
Check the timezone setting in your event's Date section. If the timezone is set incorrectly, the scheduled time may be calculated against the wrong timezone. Contact our support team if the event didn't go live at the expected time.
My event is live but ticket purchasers can't find it.
-
Check your event's privacy settings. If the event is set to Private, it won't appear in search results on stickytickets.com.au — it can only be accessed via a direct link. See: How to control event visibility on Sticky Tickets.
Can I make changes to my event after it goes live?
-
Yes — most event details can be edited after going live, including the description, images, ticket prices, and refund policy. However, changes to the event date, time, or location cannot be made from the event editor once tickets are on sale. Contact our support team for those changes.
How do I know my event is actually live?
-
After clicking Go Live Now, your event status in My Events will change to Live. You can also click the Preview link or visit your event page URL to confirm it's publicly visible.
Can I take my event offline after it's gone live?
-
Yes — you can cancel or close your event from My Events. Contact our support team if you need help taking an event offline or managing existing ticket purchasers.
What happens if I go live before I'm ready?
-
You can continue editing your event after it goes live. Most changes take effect immediately. If you went live too early and need to pause ticket sales, see How can I pause my ticket sales?
How do I schedule my event to go live at a specific time?
-
Click Make Event Live, then select Schedule for Later and enter the date and time you want the event to go live. Make sure the timezone in your event's Date section is set correctly before scheduling.
Need more help?
If you need help publishing your event, contact our support team.