Yes — you can use Sticky Tickets to manage registrations for webinars, online workshops, virtual conferences, or any online event. Attendees register and pay (or register for free) through your event page, and receive a confirmation email with their joining instructions.
How to set up your webinar event
Step 1 — Create your event
Follow the standard event creation process. See: Step-by-step guide to creating and publishing your event.
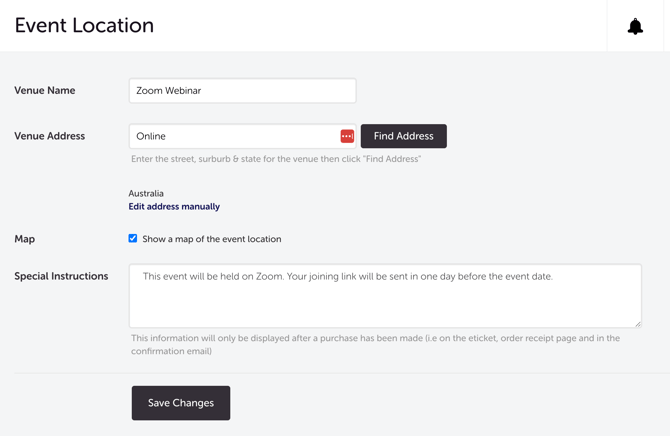
For the Event Location section:
- Leave the Full Address fields blank — there is no physical venue for an online event.
- In the Venue field, enter something descriptive like "Online" or "Virtual Event" so attendees understand the format.
- Use the Additional Information field to include your webinar platform details — for example, "This event will be held on Zoom. Your joining link will be sent in your confirmation email." This text appears on confirmation emails and e-tickets.
TIP: Do not paste the actual webinar join link in the Additional Information field if the link is private or time-sensitive — use the confirmation email message instead (see Step 3).
Step 2 — Set up your ticket type
-
For a free webinar or registration:
- Use the Free Ticket type — no payment is taken and attendees still receive a confirmation email.
- For a paid webinar:
-
Use the Single Ticket type and set your registration fee.
-
- For the Distribute e-ticket setting:
- Consider whether you need to issue an e-ticket PDF. For most webinars, a receipt and confirmation email with joining instructions is sufficient — you can leave Distribute e-ticket unticked if you prefer. Attendees will still receive a receipt.
Step 3 — Add the webinar joining instructions to the confirmation email
The most reliable way to share the webinar link with attendees is through the Additional Information field in the Event Location section. This text appears directly in the confirmation email and on the receipt.
Include:
- The webinar platform (e.g. Zoom, Teams, Google Meet)
- The join link or instructions for how to access it
- Any passwords or access codes
- The date and time (including timezone)
- Technical requirements or pre-registration steps if applicable
Important: If your webinar platform generates a unique join link per attendee (e.g. Zoom webinar registration), you will need to manage that separately outside Sticky Tickets and email attendees their individual links directly.
Step 4 — Collect attendee information (optional)
If you need to collect information from attendees — such as their organisation, dietary requirements for a hybrid event, or questions they'd like answered — add custom questions to your checkout form via Event Questions in the left sidebar.
See: How to create and manage custom questions for your event.
Most common scenarios and questions
Do attendees need to create a Sticky Tickets account to register?
-
No — attendees can register as a guest without creating an account.
Can I use Sticky Tickets for a free webinar?
-
Yes — use the Free Ticket type. No payment is taken. Attendees receive a confirmation email with the details you've entered in the Additional Information field.
Where is the best place to put the webinar join link?
-
The Additional Information field in the Event Location section is the most reliable placement — it appears in the confirmation email, the receipt, and on the e-ticket if enabled. Keep in mind this information is visible to anyone who purchases a ticket.
Can I limit registrations to a specific number?
-
Yes — set the Ticket Capacity when creating your ticket type. Once capacity is reached, the ticket type shows as sold out.
Can I send the webinar link to attendees after registration rather than immediately?
-
Sticky Tickets sends the confirmation email automatically at the time of purchase. If you want to send the join link separately (e.g. closer to the event date), you'll need to do this outside Sticky Tickets by emailing attendees directly. Export your attendee list from the Reports section.
What happens if I need to change the webinar link after tickets have been sold?
-
Update the Additional Information field in your event settings. Existing ticket purchasers will not automatically receive the update — contact our support team if you need to resend confirmation emails with updated details.
Need more help?
If you need help setting up your online event or webinar, contact our support team.