Seat blocking automatically makes a set number of seats on either side of a purchase unavailable once an order is confirmed. This prevents different groups from being seated directly next to each other.
How to enable seat blocking
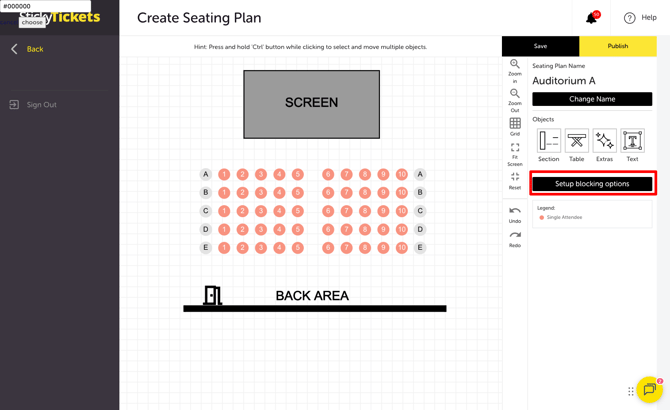
- Open your event and click the Edit Event tab.
- Scroll to the Seating Plan section and click the edit (pencil) icon to open the seating plan editor.
- In the right panel, click Setup blocking options button.
- The Manage Seat Blocking panel opens. Tick Enable seat blocking?
- Enter the Number of seats to block on each side of each order.
- Click Save.

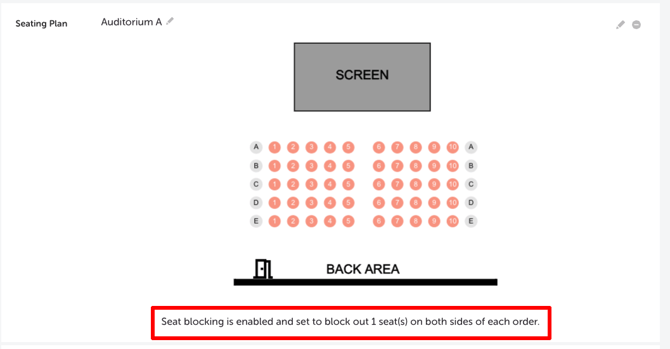
Once saved, a confirmation note appears on the Edit Event page below the seating plan preview:
"Seat blocking is enabled and set to block out [X] seat(s) on both sides of each order."
How seat blocking works
When a ticket purchaser completes an order, the system automatically marks the set number of seats immediately adjacent to their order as unavailable. This applies to both sides of the order within the same row.
Example: If blocking is set to 1 and a ticket purchaser buys seats A3 and A4, seats A2 and A5 will be automatically blocked and unavailable for other purchasers.
The blocked seats are released if the original order is cancelled.
How to unblock seats manually
If seats were automatically blocked and you need to unblock them:
-
Open the seating plan editor. You will notice some seats are highlighted — black seats are already booked by ticket purchasers, while red seats are automatically blocked seats that have not been purchased.
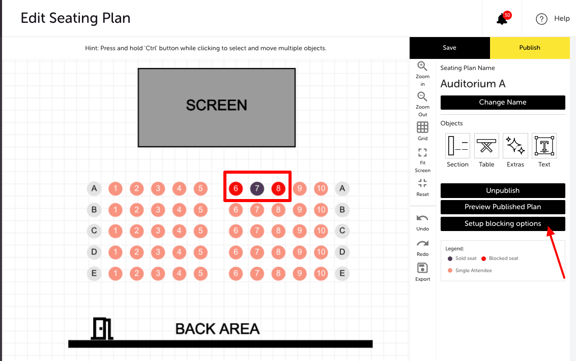
- Click on the blocked seat you want to unblock.
- Select the option to unblock the seat.

This allows you to manually override the automatic blocking for specific seats where needed.
How to disable seat blocking
- Open the seating plan editor and click Setup blocking options.
- Untick Enable seat blocking?
- Click Save.
Previously blocked seats will become available again. Seats that were blocked due to existing orders will need to be unblocked manually if required.
Most Common Scenarios and Questions
Seat blocking doesn't seem to be working after I enabled it.
-
Make sure you clicked Save after enabling the feature in the Manage Seat Blocking panel. The Edit Event page will show a confirmation note if blocking is active — if the note isn't there, blocking has not been saved.
I want to remove the blocking for specific seats only.
- Use the manual unblock option by clicking the individual blocked seat in the seating plan editor. This lets you override automatic blocking seat by seat without disabling the feature entirely.
Does seat blocking apply to all sections and tables in my seating plan?
-
Yes — when enabled, seat blocking applies across all sections in the seating plan, not just individual sections.
What happens to blocked seats if the original order is cancelled?
-
Blocked seats are released when the order that caused the blocking is cancelled, making them available for purchase again.
Can I set different blocking amounts for different sections?
-
No — the blocking setting applies a single number of seats across the entire seating plan. You cannot set different blocking amounts per section.
Will ticket purchasers see that seats are blocked?
-
Blocked seats will appear as unavailable on the seating plan at checkout. Ticket purchasers cannot select them but will not see an explanation of why they are unavailable.
Need more help?
If you need help setting up seat blocking, contact our support team.