FIEBefore you start: Not sure which ticket type to use? See: Ticket types on Sticky Tickets — before following the steps below.
PART 1 - HOW TO ADD A TICKET
Step 1 — Open your event editor
-
Go to the My Events page and select the event you want to add tickets to.
-
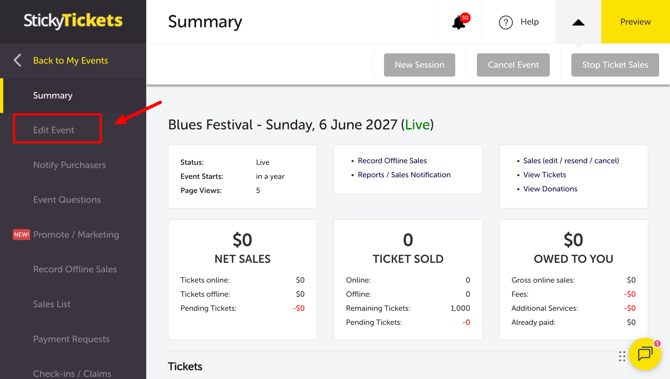
Click the Edit Event tab.
Note: If your event is already live, you'll land on the Event Summary page first — click Edit Event from there. If your event is still pending, you'll go straight to the editor.
Step 2 — Go to the Tickets section
-
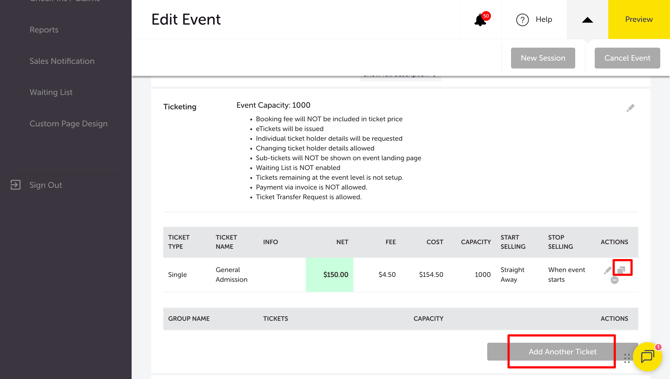
Scroll down the Edit Event page to the Tickets section.
-
Choose one of the following:
-
Copy an existing ticket — click the Copy icon under the Actions column. This pre-fills all settings from the selected ticket. Update the ticket name to avoid duplicates.
-
Create a new ticket — click Add Another Ticket.
-
ℹ️ Multiple Sessions: Running a multi-session event? From the second session onward, you'll see an option to apply a new ticket across all sessions. Tick the checkbox if you want the ticket to appear in every session.
Step 3 — Fill in the ticket details and save
Complete the ticket fields as described in Part 2 below. Click Save Changes when done.
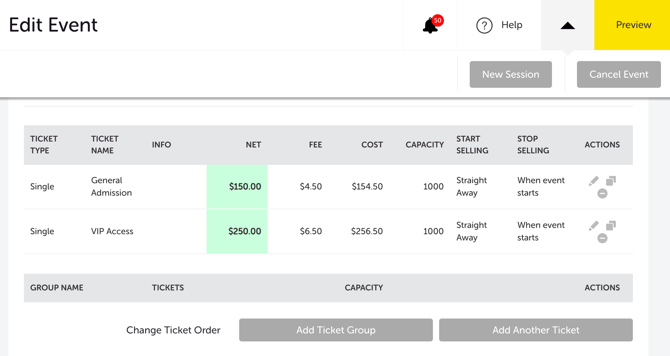
After saving your first ticket, a table appears showing each ticket type with its Net amount (what you receive), Fee (booking fee), and Cost to buyer (total price). Review these figures before going live to confirm your pricing is correct.
PART 2 - TICKET FIELD REFERENCE
Every field available when creating or editing a ticket type is documented below. Fields marked * are required before your event can go live.
CORE TICKET FIELDS
|
FIELD NAME |
WHAT IT DOES |
WHEN TO USE IT |
|
Ticket Type * |
The type of ticket — Single, Group, Open Group, Reserved Seating, Free, or Donation. See: Ticket types on Sticky Tickets. |
Select first — it determines which other fields appear. |
|
Ticket Name * |
The name buyers see on the event page and their e-ticket (e.g. General Admission, VIP, Early Bird, Family Pass). |
Always required. Keep it short and descriptive. |
|
Ticket Description |
A short description shown to buyers at checkout (e.g. 'Includes a welcome drink and reserved seating'). |
Optional. Use to clarify what's included. |
|
Price * |
The ticket price in AUD. If you're registered for GST, include the GST amount in this price. Once entered, the system shows the booking fee and total cost to the buyer. |
Required for paid tickets. Use the booking fee calculator to check your net revenue. |
|
Include Booking Fee in the Price |
Tick to show buyers a single all-inclusive price. Leave unticked and the booking fee is added on top of your ticket price at checkout. |
Tick if you want to absorb the fee or simplify the buyer experience. |
|
Ticket Capacity* |
The number of tickets available for this ticket type. For group ticket types, enter the total number of individual tickets — not the number of bundles. Example: 8 tables of 10 = enter 80. |
Required. Determines when this ticket type shows as sold out. |
|
Distribute e-Ticket |
Tick to attach a scannable e-ticket PDF to the buyer's confirmation email. |
Tick for most events. Leave unticked only if you're managing attendance manually. |
PART 3 - ADVANCED TICKET SETTINGS
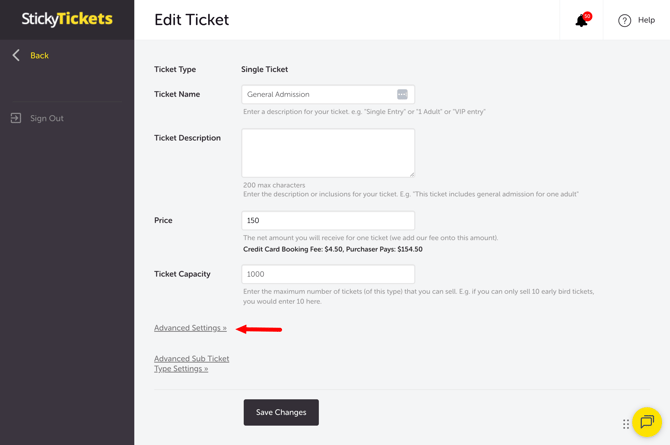
These settings appear when you are creating your first ticket. For existing tickets, click the edit (pencil) icon in the ticket list to access them.
ℹ️ IMPORTANT: Advanced settings are not visible after your first ticket has been saved. Access them by clicking the edit icon on any existing ticket.
|
|
FIELD NAME |
WHAT IT DOES |
WHEN TO USE IT |
|
A |
Max Per Order |
Maximum number of this ticket a buyer can purchase in a single transaction. |
Limit bulk purchasing or enforce group size rules. |
|
B |
Min Per Order |
Minimum number of this ticket a buyer must purchase in one transaction. |
Enforce minimum group sizes or bundle requirements. |
|
C |
Start Selling |
When this ticket goes on sale. Choose Straight Away (available as soon as the event is live) or set a specific date and time. |
Create Early Bird tickets that go on sale at a set future time. |
|
D |
Stop Selling |
When ticket sales for this type close. Choose a pre-defined period before the event or a specific date and time. |
Set an Early Bird end date, or close sales before the event starts. |
|
E |
Show Tickets Remaining (ticket level) |
Displays a low-stock notice on the event page once remaining tickets for this type fall below the threshold you set. Leave blank to hide. |
Create urgency for popular ticket types nearing sell-out. |
|
F |
Show Tickets Remaining (event level) |
Displays a notice for total remaining tickets across all types once the event-wide count falls below the threshold. Leave blank to hide. |
Show overall event availability without revealing individual ticket stock. |
|
G |
Sales Channel |
Choose where this ticket can be purchased: online (event page), Check-in App only, or both. |
Use Check-in App only for door sales or staff tickets not available to the public. |
|
H |
Hide Ticket |
Hides this ticket from the event page until a buyer enters a promotional code, or when it is configured as a sub-ticket. |
Create members-only or staff tickets accessible only via a code. |
PART 4 - EVENT LEVEL SETTINGS
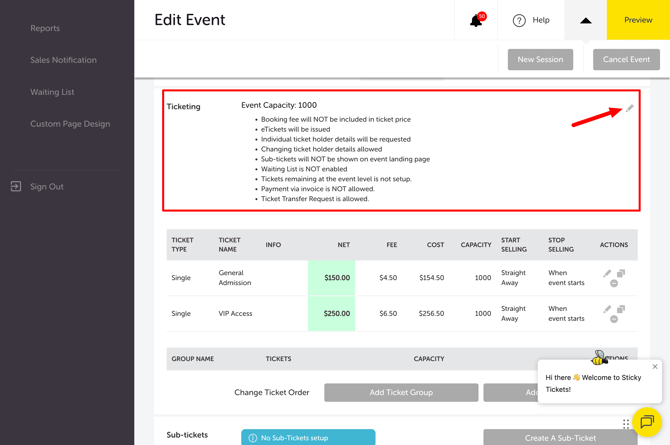
These settings apply to your entire event — not individual ticket types. They appear in the Tickets section after your first ticket has been created.
|
SETTINGS |
WHAT IT DOES |
WHEN TO USE IT |
|
Event Capacity |
The total number of tickets that can be sold across all ticket types combined. Your event shows as sold out when this number is reached, even if individual ticket types still have remaining capacity. |
Set this to your venue capacity. |
|
Individual Ticket Holder Details |
Allows buyers to enter a separate name for each ticket purchased, rather than using the buyer's name for all tickets. |
Enable for events with named entry lists, table seating, or corporate bookings where each attendee needs to be identified. |
|
Enable Waiting List |
Allows buyers to join a waitlist when all tickets are sold out. You can notify waitlisted buyers if tickets become available. |
Enable for popular events where demand may exceed capacity. |
|
Distribute e-Ticket |
Issues a scannable e-ticket with every order for the entire event, regardless of individual ticket type settings. |
Use as an event-wide override if you want all ticket types to include an e-ticket without setting it individually per type. |
|
Show Sub-tickets on the Event Page |
Sub-tickets are displayed automatically when a buyer lands on your event page, rather than appearing only after a parent ticket is selected. |
Enable if you want buyers to see add-on options (e.g. merchandise, parking) immediately without having to select a parent ticket first. |
💡 Helpful Tip: Need to group multiple ticket types under a shared capacity limit? Use the Ticket Group Capacities feature. See: How to set up ticket group capacities.
PART 5 - TROUBLESHOOTING
Advanced settings aren't visible when I edit a ticket.
-
Cause: Advanced settings (A–H) only appear when creating your first ticket.
-
Fix: Click the edit (pencil) icon next to the existing ticket in the ticket list. The advanced settings are accessible from within the individual ticket edit view.
My ticket type isn't showing on the event page.
-
Check:
-
The ticket's Start Selling date has passed
-
The Hide Ticket option is not ticked
-
The ticket still has remaining capacity
-
The event status is Live, not Pending or Scheduled
-
Buyers are confused by the total price at checkout
-
Fix: Tick the "Include Booking Fee" box in ticketing settings. Buyers will see one all-inclusive price rather than a base price with a fee added at checkout.
The ticket capacity is selling out faster than expected.
-
Check: For group ticket types, confirm you entered the total number of individual tickets in the Ticket Capacity field — not the number of group bundles. Example: 8 tables of 10 should be entered as 80, not 8.
I need to change the ticket type after tickets have been sold.
-
Changing the ticket type on an existing ticket after sales have begun may not be possible from the event editor. Contact our support team — they can advise on the best approach for your situation.
NEED MORE HELP?
If you need help in configuring your tickets for your event, contact our support team.